Windows Media Player has always been the default media player in Windows for more than two decades. It has incorporated numerous changes over the course of the years, adding up many new features along the way.
One of the more popular features in Windows Media Player is the album feature which allows the user to group the songs by their albums. The album art plays a vital role in this scenario, however, a wrong album art image will end up wronging the user. Therefore Windows Media Player provides a number of ways to change the album art with ease. Here we go then.
Solutions
Solution 1: Automatically Retrieve the Album Art
Album art can automatically be retrieved and updated without the need for the user to know anything about the album. This feature is quite useful as it fetches the correct image for album art that contained a wrong entry uptil now.
- Make sure the songs are showing up in the Music area of Windows Media Player. The Album category shows up all the albums.
- Move the cursor on the empty space of the trial bar (as seen in the following screenshot) and right-click it.
- Select View from the menu that will open, then select Show menu bar to make the menu bar visible over the trail bar.
- Click Tools and then select Options.
- Switch to the Library tab. Locate the Retrieve additional information from the Internet option and select its checkbox as well as the checkbox for its corresponding sub-item Overwrite all media information. This latter option basically will retrieve and update all the missing or distorted metadata (including the album art) of the music files which have been added in the Windows Media Player.
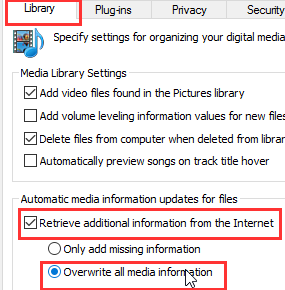
Opting to retrieve info over the Internet and replace any existing info
Solution 2: Use “MetaServices” to Find and Change Album Art
MetaServices is a native web-based repository from where metadata of music files can be retrieved to change. As long as the metadata presents here, album art of music files can be changed fairly easily.
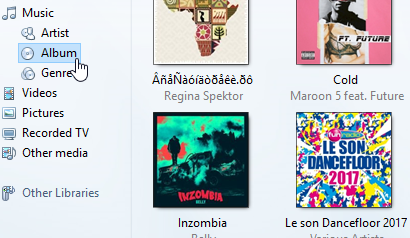
- Navigate to Album item in the Music section.
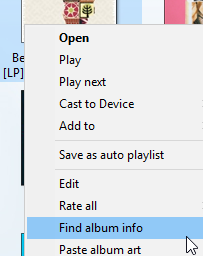
- Find the album whose art has to be changed, right-click it and select Find album info.
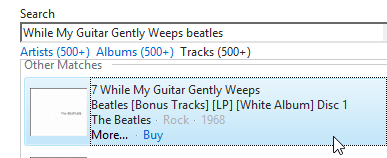
- Search for the album in the Search Box, select the concerning Search Result and click Next.
- Make sure the album art and its details are correct prior to applying any changes to the album. Once everything is in the right order, click Finish to save the changes.
Solution 3: Manually Pasting the Album Art
If both of the methods mentioned earlier didn’t help change the album art of the music files, now the only option left is to use the manual method. This can be very tiring though if there is a very bulky collection of albums.
- Once again, make your way to the Music area in the Windows Media Player. Now click Album and then find the album whose art is to be changed. Once you’ve located the requisite album, right-click it and select Edit. Now copy its name by using the Ctrl + C shortcut combination.
- Now Google up the album name you just copied, go through the Search Results until you find the most relevant result.
- In this tutorial, we will use Amazon to copy the album art. You can use any source of your choice.
- Right-click the album art and select Save image as to save the image to the local file system.
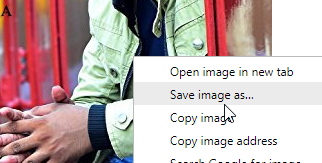
Saving the Album Art - Once the image has been saved, copy it from the File Explorer/ Windows Explorer.
- Now go back to Windows Media Player, right-click the album you selected earlier in step # 1 and finally select Paste album art.
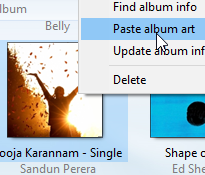
Pasting the new Album Art image - As soon as the album art is pasted, the changes will be applied instantly and visible forthwith.

Album Art updated!

Warning: Undefined array key "author_box_bio_source" in /home1/clonefil/public_html/blog/wp-content/plugins/molongui-authorship/views/author-box/parts/html-bio.php on line 2
Raza Ali Kazmi works as an editor and technology content writer at Sorcim Technologies (Pvt) Ltd. He loves to pen down articles on a wide array of technology related topics and has also been diligently testing software solutions on Windows & Mac platforms. If you have any question about the content, you can message me or the company's support team.