Zoner Photo Studio is an image editing and organizing software primarily used by digital photographers. We sometimes download the same image over and again either as a mistake or because we simply can’t recall where we saved it the last time. And so the easiest way is to simply download it rather than sift through mounds of data which will surely take up a lot of time all for a single image!
Either way, this results in the creation of dupes which waste precious space on the hard drive, thereby creating difficulties in searching for a particular image as well as resulting in a complete mess over time. This article sets out on providing various workable solutions to help deal effectively with Zoner Photo Studio duplicates. One automatic way to delete Zoner duplicate photos is to scan your PC with Clone Files Checker. Download it here:
Zoner Photo Duplicates? Download Clone Files Checker
Clone Files Checker follows Google Software Principles
Using an In-Built Dupes Finder
Having a hard time managing your Zoner Photo Studio pictures library? You need to get rid of unnecessary clutter from your hard drive. Zoner Photo Studio contains an automatic duplicate cleaning feature which can help you in scanning out duplicate files and removing them for good.
- Double-click the Zoner Photo Studio icon on the Desktop.
- Click the Menu icon on the left.
- Select Organize | Find Duplicate Files.
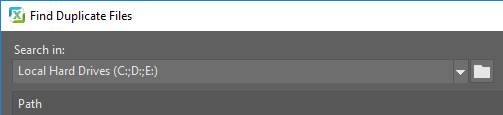
- You now have the Find Duplicate Files dialog box on your screen.
- In the Search in drop-down menu, ensure that the Local Hard Drives option is selected. You can go for custom locations as well e.g. Pictures, Downloads, etc.

Select the target location - If you wish to restrict the scan so that it only looks for files with identical names, select the checkbox for Show only files with matching names. However, using this isn’t a recommended method.
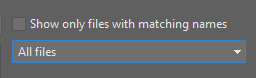
- Select the All Files option in the underneath drop-down box and then click on Search.

Delete Photo Backups
Zoner Photo Studio automatically backups the pictures while you’re busy performing all of your pressing image related tasks. In order to free you of any stress related to losing even a kilobyte of the images, it contains a neat feature that continues to backup your photos while you’re busy processing them. Although these backups aren’t visible in the main user interface, over a period of time they grow up and occupy a substantial amount of hard disk space. Deleting them can potentially free up a significant amount of disk space. Here are two alternative techniques to delete application backups:
- Click the Menu icon.
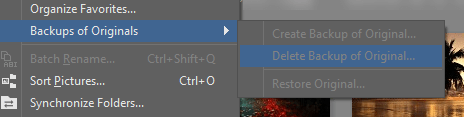
- Select Organize, point to Backups of originals.
- Now click the Delete Backup of Original option.

Note: If no backups are found, the option will be greyed out (disabled).
Alternatively, you can delete backups from the application settings as follows:
- Click the Menu icon and point to View | Preferences.
- Click the Backups tab.
- You will now be provided with the total size of the backup folder on the hard disk. Click on Delete Backups of Originals.
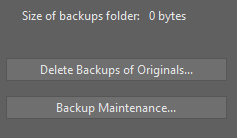
Hit Delete Backups of Originals - Click Yes on the prompt that will appear.

Delete Synchronized Photo Copies
The Photo Synchronization process entails making an image file available at multiple locations. It is a two-way process that reflects any changes that have been made to the original file. You can remove the automatically synced photo files and free up the disk space.
- Click the Menu and point to Organize.
- Select the Synchronize Folders option.
- In the new dialog that opens, the destination will be listed in the Target Folder text box.
- Using File Explorer, browse the destination folder and delete all the synced files.
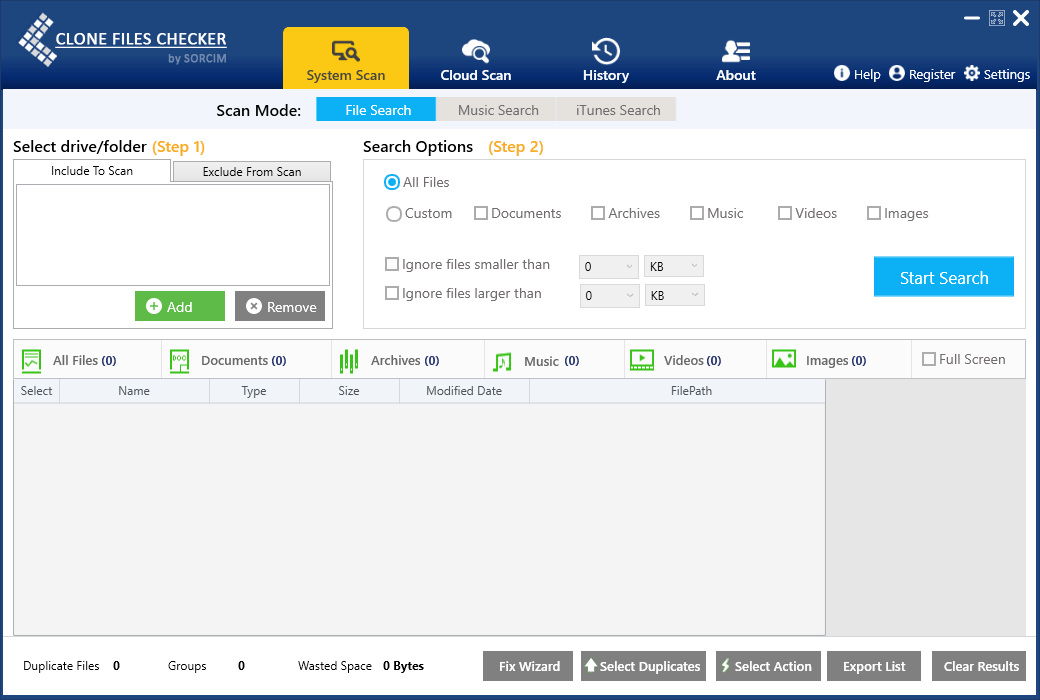
Scanning Duplicates with Clone Files Checker
The main advantage Clone Files Checker holds over Zoner Photo Studio’s in-built duplicate finder is its ability to backup duplicate copies. Moreover, the scan criteria enable users to include/ exclude drives, folders, and subfolders as per their requirements. CFC allows scanning for specific file types, sorting and exporting the scan results.
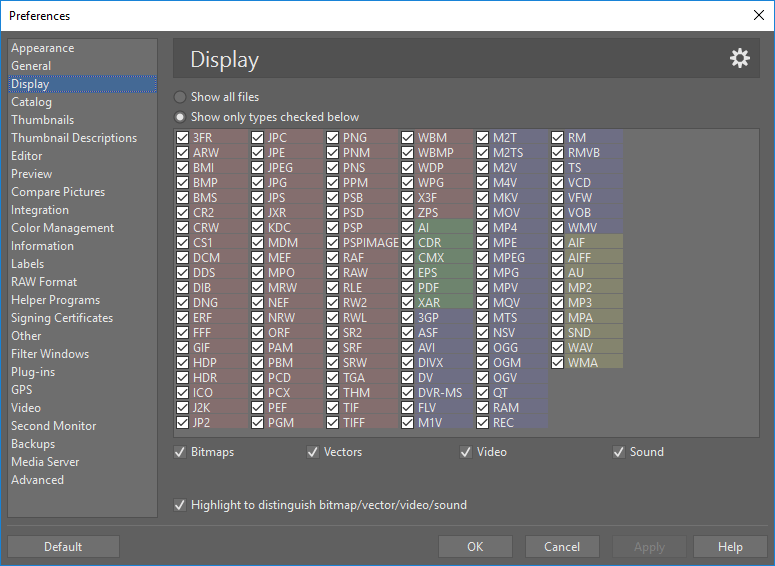
Step # 1: Determine Zoner Photo Studio Supported File Types
- Open the Preferences dialog and click the Display tab.

- Note down all Zoner Photo Studio supported file extensions.
Step # 2: Identify the Catalog Folders
- Open the Preferences dialog once again and now click the Catalog tab.
- Note down all the picture folders listed under Cataloged Folders.
Step # 3: Start a Scan with CFC
- Download Clone Files Checker and install it.
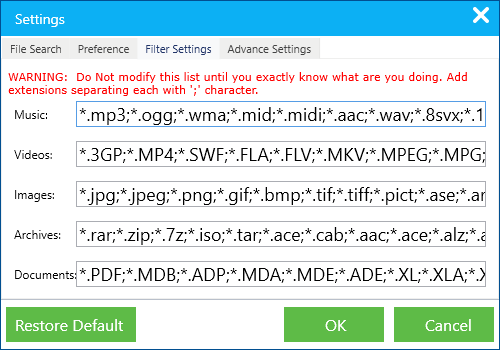
- Now launch the program and click the Settings icon in the upper right corner.
- Now click the Filter Settings tab.
- One by one add all the Zoner Photo Studio supported extensions into the Images, Videos, and Music textboxes respectively. Separate each of them with a semicolon (;).
- Click OK.

- In the Select Drive/ Folder category, click the Add button.
- Select all the Zoner Photo Studio catalog folders you noted a while back.
- After adding up all the folders, it’s time to configure the scan.

Browsing for the target scan location - Customize the file size filters to filter out files smaller or larger than a specified size.
- To begin, click on the Start Search button.

- The scan will be launched, and the results will be displayed on your screen in a few minutes.

Step # 4: Take an Action
Option 1 Taking an Immediate Action
- Click Fix Wizard to automate the duplicate cleaning task.
- Select a file version of your choice. Oldest represents the original file whereas Newest represents its duplicate copy.
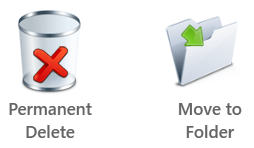
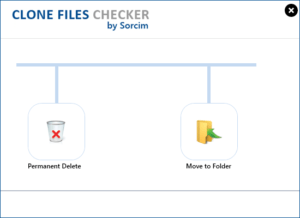
- To delete the files permanently, click the Permanent Delete option. To review your data at a later point in time, click the Move to Folder option, and then select your destination directory.
Make your choice

Option 2: Analyzing the Results
- Click Review & Fix to gather results into a single window. Move the cursor and select a file to view its preview in the panel on the right.
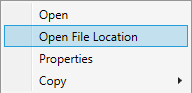
- To view a file path, right-click a file and select Open file location.
- Similarly, you can open a file, view file properties, copy the file name, path, and hash to the Clipboard, a temporary storage area used to copy content from one application to another.
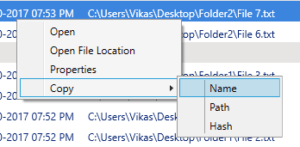
Point to Copy | Name - Click on Select Duplicates, and select an option of your choice. In this example, we choose to retain the most modified file in each group.
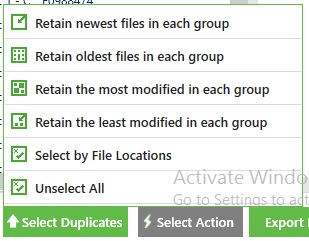
- Click on Select Action. Either decide to delete the files permanently or move them to a folder from where you can access them in the future, when required.
Choose appropriately


View Scan History and Restore Previous Backups
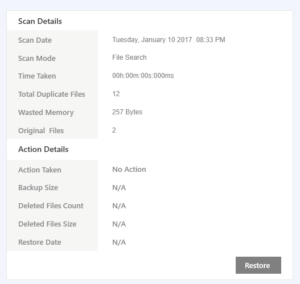
There’s a neat way to view a general report of the previous scans, including the backups. It contains detailed information about the scan activities performed over a period of time. You can either restore all or a set of duplicate files of your choice.
- Click on the History tab in Clone Files Checker.
- Select a scan among various completed scans in the left panel.
- In the right panel, you will get full details such as date of the scan, time taken, wasted memory, total duplicates found, what action was taken, the size of your backup etc.
- To restore a backup, click the Restore button.
- It will prompt you to select the files and a target destination.

Notes:
- If a backup is unavailable, the button will be greyed out.
- Deleting backups is a very handy way to free up disk space.
Manually Searching for Duplicates
Manually searching for duplicates is a long, tedious task. If you prefer this method, you’ve got to open up the directory that contains the image files, sort them in an ascending order and then figure out duplicate copies.
- Open the File Explorer.
- Go to the Zoner Photo Studio catalog folder(s) you noted earlier.
- Click the View tab and then click the Sort by icon.
- Select Name, and then Ascending.
- Your files will now be listed in the ascending order.
- Right-click a duplicate file and select Delete. Confirm the action when you get the prompt.
- Delete all duplicates in a similar manner.

Warning: Undefined array key "author_box_bio_source" in /home1/clonefil/public_html/blog/wp-content/plugins/molongui-authorship/views/author-box/parts/html-bio.php on line 2
Raza Ali Kazmi works as an editor and technology content writer at Sorcim Technologies (Pvt) Ltd. He loves to pen down articles on a wide array of technology related topics and has also been diligently testing software solutions on Windows & Mac platforms. If you have any question about the content, you can message me or the company's support team.