Until recently there wasn’t any direct method of changing filenames in Amazon S3 (Simple Storage Service).
This means that the user was left with no option but to download the data to their computer, rename it and then upload it back onto Amazon S3 web interface. This is an inefficient method by all means, which neither guarantees accuracy nor provides for a speedy mass renaming solution. The good news is that now you can rename the S3 files 100% online using our web-application, Cloud File Renamer.
Amazon S3 Files Renaming:
Our company has launched the Cloud File Renamer (CFR) web-service. It uses official APIs of Amazon AWS S3, OneDrive, Google Drive and Dropbox. You can rename your cloud files, including the AWS S3 files, completely online. The CFR web-application employs 256-bit encryption and doesn’t store your passwords and files. You can create a no-obligation CFR account here: https://www.cloudfilerenamer.com/
To learn how the Cloud File Renamer’s Amazon AWS S3 renaming works, read the Method 1 explained below:
Method 1: Rename Online Using the Cloud File Renamer Service
Using Cloud File Renamer is fairly simple and doesn’t require you to attain any programming knowledge. Follow these steps to rename files and folders in Amazon S3 with great ease.
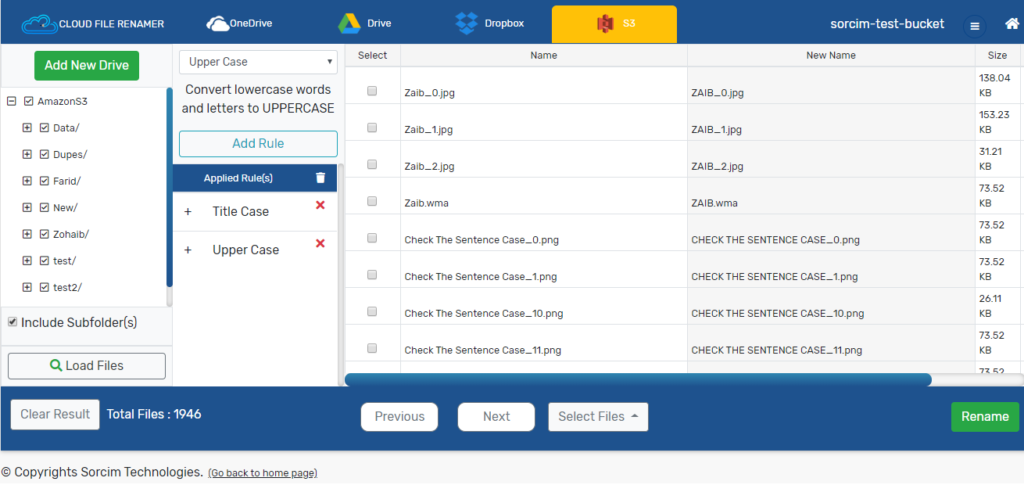
- Open up the cloudfilerenamer.com website.
- Create an account using these options: Signup with Google, Signup with Microsoft, and Signup using your Email.
- After Signup, click on the Login link to enter into the application dashboard
- Click on the S3 tab
- Click on Add New Drive button and enter your Bucket Name, Access Key ID and the Secret Key. (Be assured, your private information and content of the files is not visible to the CFR.
- Now click on Load Files and review all the Renaming Rules available in the application.
- By default all of the files inside your Bucket are Pre-selected. You can un-select all files and then manually check the files before you add a Renaming Rule.
- There are 12 methods to rename your Amazon S3 files.
- Add a Rule and preview the changes in the NEW NAME column.
- Once you are sure you have added the Renaming Rules, click on the Rename button to finally rename your AWS S3 Cloud files.
This method only helps rename one file/ folder at a time and has its own set of limitations with regards to accuracy as well as the time required to rename data in massive quantities. It also requires the users to download all such files to their computer which have to be renamed.
Method 2: Using Command Line Tool
To rename Amazon S3 files in bulk you’ll have to use the AWS Command Line Interface (CLI). Download and install the AWS Command Line Interface (CLI) tool and use a script to automatically rename Amazon S3 files.
- Install and launch the AWS Command Line Interface (CLI).
- Make sure you’re logged into your account online.
- Copy this script to the command line:
aws s3 –recursive mv s3://<bucketname>/<folder_name_from>/<old_file_name> s3://<bucket>/<folder_name_to>/<new_file_name> - Add the necessary info in the above script. Replace bucketname with the name of the bucket where the file you need to rename is included, followed by the folder name and then add the old filename/ names. Next, add the name of a new bucket, folder, and the new filename.
Method 3: Easy File Renamer
The traditional way to bulk rename Amazon S3 files is to make use of an automated software. This helps in achieving the desired results with the highest degree of accuracy with swiftness. Easy File Renamer is one such solution that lets you execute mass renaming of the data while keeping things simpler for you at the same time. You have the option to choose from 10 flexible renaming rules. To rename files using Easy File Renamer, you’ll have to download the files from Amazon S3 onto the hard drive or migrate them to the cloud. Here is how you will proceed ahead:
- Download Easy File Renamer from the official site and then execute the setup file to install it.
- Launch the program and add files/ folders which you want to rename from the Step 1 section.
- Now apply the most relevant renaming rule from Step 2 on the leftmost area.
- Depending on the renaming rule you just selected, you might have to enter data in 1 or 2 text-boxes (or none) as well as make your choice (in some cases) from the various options located just under the Select Rules dropdown menu.
- Click the Add Rule button right below the text-boxes to confirm the renaming rule selection.
- Now simply click the green Rename button in the right-most corner and confirm your command by clicking Yes in the prompt.
That’s it. Mission accomplished!

Warning: Undefined array key "author_box_bio_source" in /home1/clonefil/public_html/blog/wp-content/plugins/molongui-authorship/views/author-box/parts/html-bio.php on line 2
Raza Ali Kazmi works as an editor and technology content writer at Sorcim Technologies (Pvt) Ltd. He loves to pen down articles on a wide array of technology related topics and has also been diligently testing software solutions on Windows & Mac platforms. If you have any question about the content, you can message me or the company's support team.