If you’re a regular Google Chrome user, you may have frequently experienced the recurring Adobe Shockwave Flash plugin error. Here, we show you how to fix this issue safely and quickly.
All the multimedia content you view online is downloaded to your hard disk. If the disk space specified for storing this content is inadequate, Shockwave Player stops responding. Specify higher storage space to resolve this issue.
1. Load a webpage and play multimedia content. For example: Flash game/ Flash animation.
2. Select Settings from the drop down menu.
3. Click the Local Storage tab.
4. Specify higher storage space by moving the sidebar to the extreme right.
5. Click Close button, exit and re-open your web browser.
Modify the MMS.CFG file to turn off the Protected Mode feature. Modify the file contents as discussed below:
1. Double click the Computer icon on your Desktop.
2. Open the following path:
C:\Windows\System32\Shockwave\Flash
3. Press F3 to initialize the Search. Type “MMS.CFG” in the Search Box.
4. Right click “MMS.CFG” file, select Open with | Notepad.
5. The file will be opened in Notepad. Click Edit | Find.
6. Type “ProtectedMode” in the Find What textbox. Click Find Next button.
7. To disable the Protected Mode, simply replace the default setting with the new one.
Default Setting:
ProtectedMode=1
New Value:
ProtectedMode=0
8. Click File | Save.
9. Exit the Notepad.
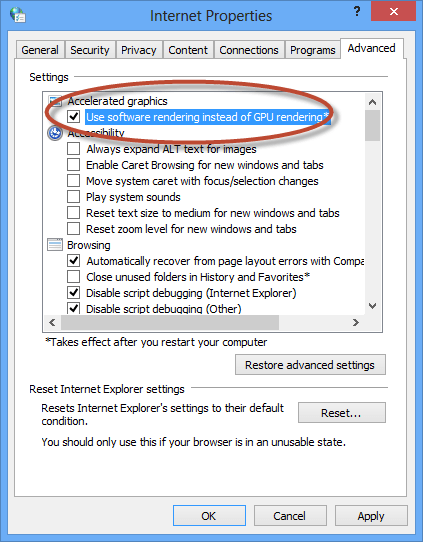
Hardware Acceleration allows the computer hardware to perform certain tasks quicker as compared to applications executing on general-purpose CPU. Disable the hardware acceleration feature to enable the Software Rendering feature automatically.
1. Press Windows Key + R simultaneously.
2. Type “inetcpl.cpl” in the Open with textbox.
3. Click OK button.
4. Internet Properties dialog will load.
5. Check the following checkbox under Accelerated graphics category:
Use software rendering instead of GPU rendering
6. Click Apply, and then OK.
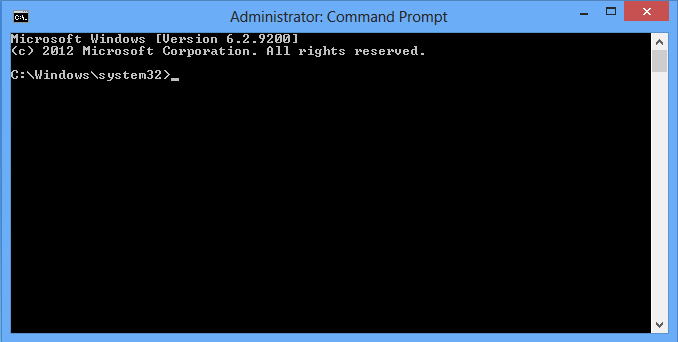
Check whether GCSWF32.dll file registration entries are corrupt. Un-register and re-register the file using Command Prompt.
1. Press Windows Key + X.
2. Select “Command Prompt (Admin)”
3. Execute the following commands:
Regsvr32 -u C:\Users\<UserName>\AppData\Local\Google\Chrome\Application\<Version >\GCSWF32.dll
Regsvr32 C:\Users\<UserName>\AppData\Local\Google\Chrome\Application\<Version >\GCSWF32.dll
4. Exit the Command Prompt.
5. Reboot your PC.
1. Click the Start button.
2. Click All Programs | Accessories.
3. Right click Command Prompt, select Run as administrator.
4. Refer to Steps # 3-5 from Windows 8.1/ 8 user’s paragraph.
Corrupted software installation is becoming a very common problem nowadays. Uninstall the Shockwave Flash Player and reinstall it again.
1. Press Windows Key + X simultaneously
2. Select Programs and Features.
3. Right click Shockwave Flash Player, and select Uninstall.
4. Follow the removal wizard. Reboot your computer once the uninstall wizard ends.
1. Click the Start button, select Control Panel.
2. Type “Uninstall a program” in the Search Box.
3. Press ENTER key.
4. Refer to Steps # 3-4 from Windows 8.1/ 8 user’s paragraph.
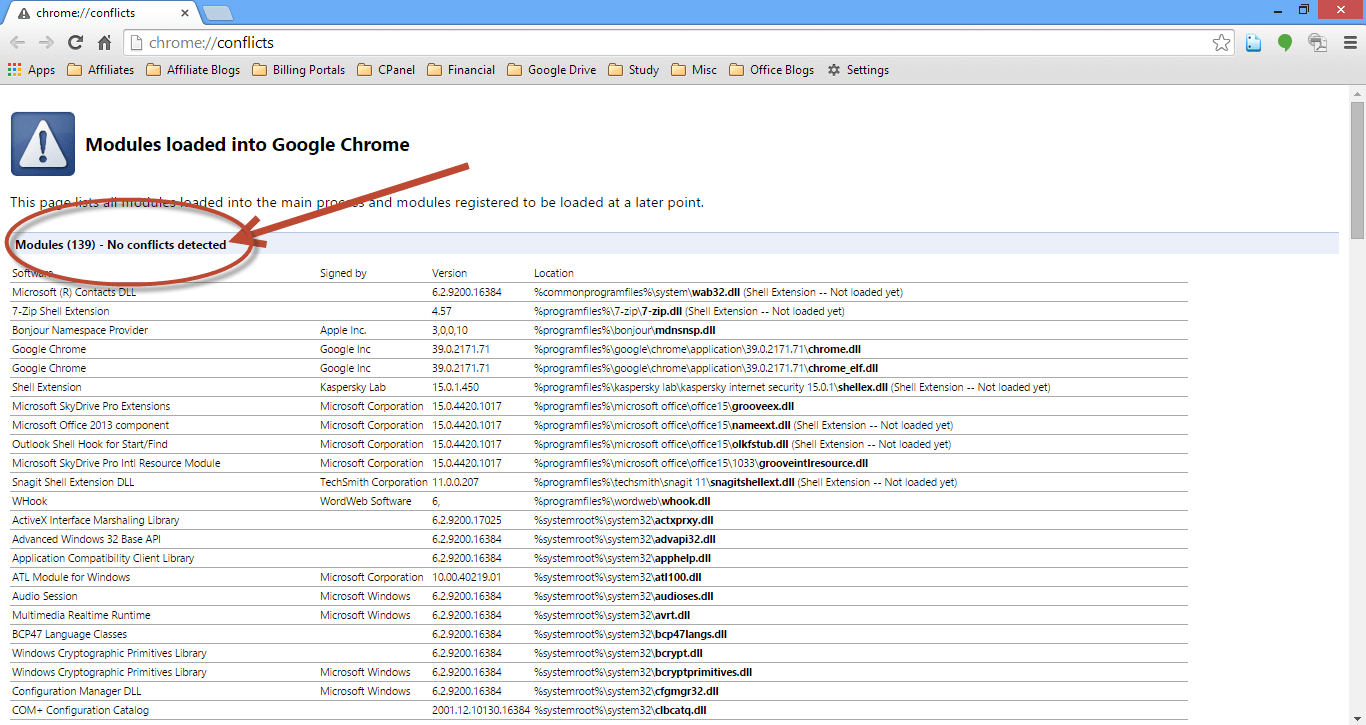
Some modules can clash with each other and cause Google Chrome to crash repeatedly. This includes antivirus, 3rd party and network-related modules commonly. Check for possible conflicts with the existing modules, and if any conflicting modules are found please disable them.
1. Type “chrome://conflicts” in Google Chrome address bar.
2. If any conflicting modules are detected, update the concerning software to the latest available release. If you do not use that software, uninstall it completely. If no conflicts are detected, you’ll see a message “Modules (total number) – No conflicts detected”.
3. Reboot the PC after successfully uninstalling / updating programs associated with conflicting modules.
Spyware and malware may cause instability in your web browser. A spyware or malware may have took over your computer thereby leading to many problems. Use a powerful and up-to-date Antivirus software to remove any such irritants. Go for a Full scan of the partitions of your hard disk and any removable storage devices connected to your PC. Make sure the antivirus engine and virus database are updated automatically on a regular basis. It is advisable to schedule a weekly scan.
1. Open Kaspersky Internet Security 2014.
2. Click the Scan icon.
3. Click Full Scan icon in right-panel.
4. This may take a long time depending upon the size of your hard disk and other removable media.
1. Click the “Update” icon in the main user interface.
2. Click “Run Update” button.
1. Click “Settings” link at the bottom of the main user interface.
2. Settings dialog will open.
3. Click the Scan tab.
4. Click “Scan Schedule” link.
5. Select “Full Scan”.
6. In the next dialog box, set Run Scan=> every weekend.
7. Specify a preferable time, e.g. 11:00 AM.
8. Click the Save button.
Hypervisor-protected code integrity, simply known as Memory Integrity in Windows 11, is used to shield…
The 1040-X is also known as the Amended U.S. Individual U.S. Income Tax Return form.…
Accountants manage tax return files as one of their services, and if they have many…
Whether music is your biggest passion or you only hear it from time to time,…
Both Google Photos and OneDrive are one of the biggest and most popular online cloud…
Google Photos is a single place to store all your photos, sync, and share them…