This article covers:
(1) Deleting Duplicate Excel Workbooks
o Using Windows Search
o Using Clone Files Checker
(2) Deleting Duplicate Cells in an Active Workbook
o Using Remove Duplicates Function
o Using Advanced Filters
o Using Conditional Formatting
There is no in-built tool in Windows that can find duplicate Excel Workbooks. You can either manually delete duplicates using some search techniques or an external identical file cleaner tool.
Use the Windows Search to find variety of Excel Workbooks with different file extensions. Sort the listed search results alphabetically. Delete duplicate Excel Workbooks accordingly.
1. Double click Users folder on your Desktop.
2. Double click My Document subfolder in the User’s Library.
3. Press F3 key of your keyboard.
4. One by one search for following file extensions in the Search Box located on top right corner:
Note: The above file extensions are different Office Excel file formats, such as, Microsoft Office Excel Workbook (.xlsx), Excel Macro-Enabled Workbook (.xlsm), Excel Binary Workbook (.xlsb), and so on.
5. Search Result will come up with numerous files.
6. Click the downward arrow on top right corner to expand the Ribbon, or simply press Ctrl + F1 keys simultaneously.
7. Click the View tab on the Ribbon.
8. Click “Details Pane” under Panes to show file details in a separate right-corner panel.
9. Click “Details” under Layout.
10. Click “Sort by” under Current View, and select Name.
11. Make sure the list appears in an ascending order, by checking Ascending option in “Sort by” context menu.
12. Now all duplicate Excel Workbooks will be sorted alongside original ones. Delete the duplicates by pressing Delete key on your keyboard.
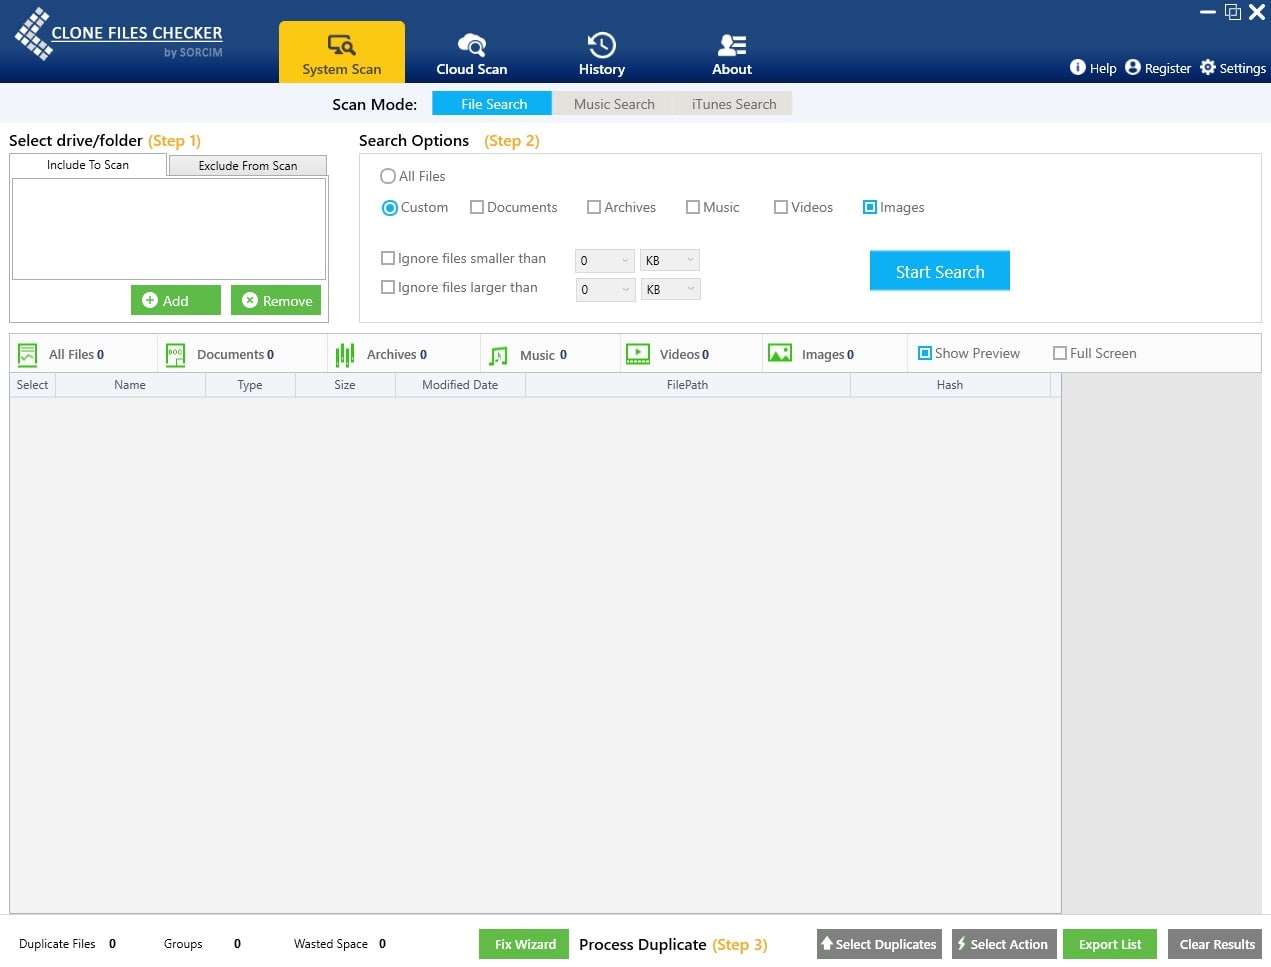
With Clone Files Checker you can recover hard disk space wasted by duplicate Excel Workbooks. The program will come up with list of all duplicate Workbooks found on your hard disk. All you’ve to do is move them to Recycle Bin, or a different folder, or delete them permanently. Download Clone File Checker now.
Microsoft Office Excel enables organizing your spreadsheets in different ways. It is important to delete duplicate data before saving record of business clients, email subscribers database and financial records.
Duplicates Remover function is a part of Excel data tools. All you’ve to do is select data with duplicate cells and use the function to automatically remove duplicates.
1. Open Microsoft Office Excel 2013 from the Start Screen.
2. Open the workbook that contains multiple duplicate cells. To do so, click the File button, and select Open. Click Computer | Browse icons. Locate your existing Workbook.
3. The Workbook will now open.
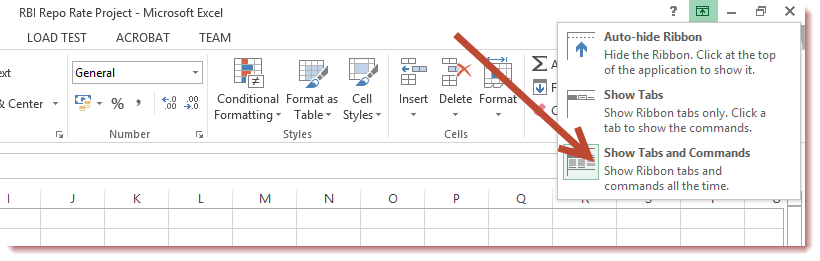
4. If the Ribbon is hidden, show the tabs and commands. To do so, click the Ribbon Display Options icon, and select Show tabs and commands.
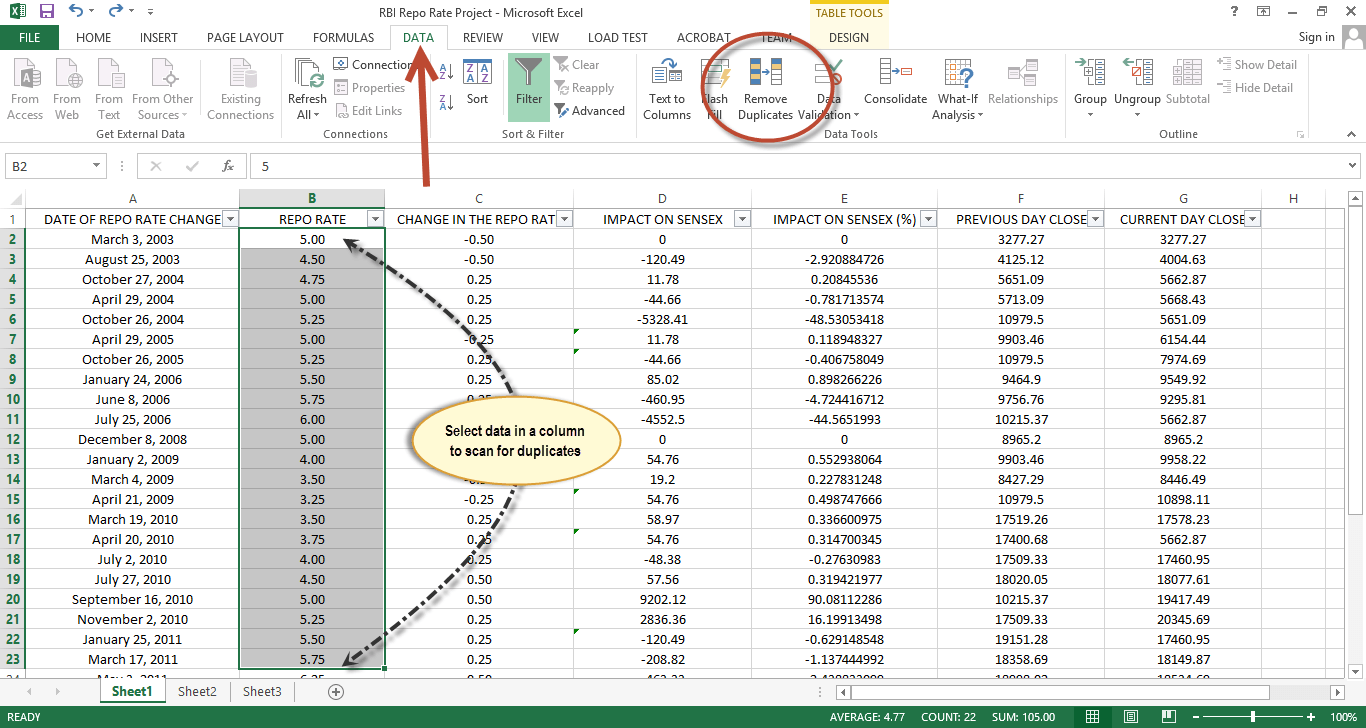
5. Select the cells in dataset in a single column of your Workbook. Click the Data tab in Ribbon.
6. Click Remove Duplicates under Data Tools.
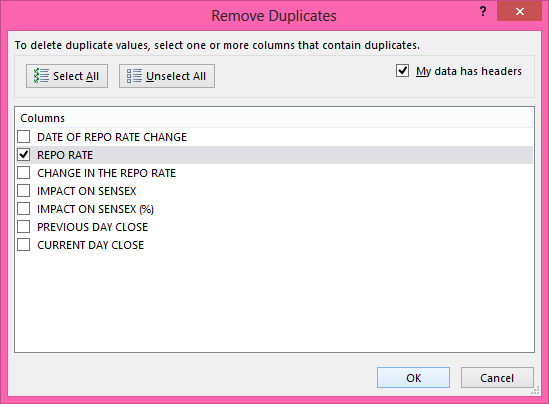
7. A new dialog will open. The dialog will list names of the columns in your Workbook.
8. Click “Unselect all” button. Check-up checkbox of that column you selected in Step # 5 above.
9. Click the OK button.
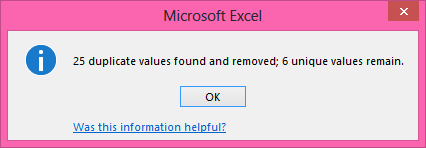
10. Microsoft Office Excel will automatically remove duplicate data from selected columns. A popup box will appear notifying total number of duplicate values found and removed; along with unique values that remain in the Workbook.
With Advanced Filters function you can create a compiled list of unique records. It first filters duplicate data, generates a list of unique records in cell range either in same Workbook or a different one.
1. Open Microsoft Office Excel 2013.
2. Open the Workbook that contains duplicate data. Refer Steps # 1-2 from Using Remove Duplicates Function section.
3. Select the cells you want to scan for duplicate values.
4. Click the Data tab on the Ribbon. If the Ribbon is invisible, follow Steps # 4 from Using Remove Duplicates Function section.
5. Click Advanced under Sort & Filter.
6. Advanced Filter dialog will open.
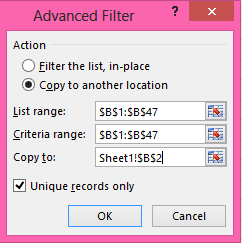
7. Select the option named “Copy to another location”.
8. Check-up the box entitled “Unique records only”.
9. “List range” textbox will automatically show data range of selected cells.
10. Enter the same value in “Criteria range” textbox as in the Step # 9.
11. Click the Cell Selection icon ahead of “Copy to” textbox, select the cells where you want the new data to be pasted. Alternatively, you can specify the data range in the “Copy to” textbox. The data range can be in same sub sheet or a different sub sheet in the same Workbook, or a sub-sheet in a different Workbook.
12. Click the OK button.
13. Depending on the sub-sheet you selected- either from same or a different Workbook- the new data will be pasted without duplicate cells. That is to say, the existing data with duplicate cells will be filtered and new data will be pasted without any duplicates.
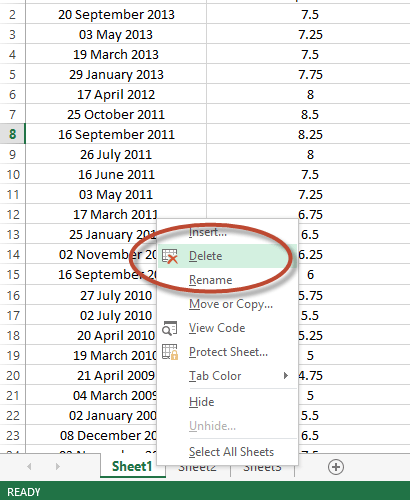
14. Now it’s time to delete the original data with duplicates. Right-click the sub-sheet that contains unfiltered data, and then select Delete option.
15. Save your Workbook. Click the Save icon on the Quick Access Toolbar.
Note: Specify an empty cell range in the “Copy to” textbox in Step # 11. Otherwise, Microsoft Office Excel will automatically overwrite the existing data with the new one.
Conditional Formatting is used to change the formatting of a cell if certain criteria are met. Apply conditional formatting function to change font formatting such text color, back color, borders if duplicate data is detected in your Workbook.
1. Open Microsoft Office Excel 2013.
2. Open the Workbook that contains duplicate data. Refer Steps # 1-2 from Using Remove Duplicates Function section.
3. Select the cells to scan for duplicate data.
4. Click the Home tab on the Ribbon. If the Ribbon is invisible, follow Steps # 4 from Using Remove Duplicates Function section.
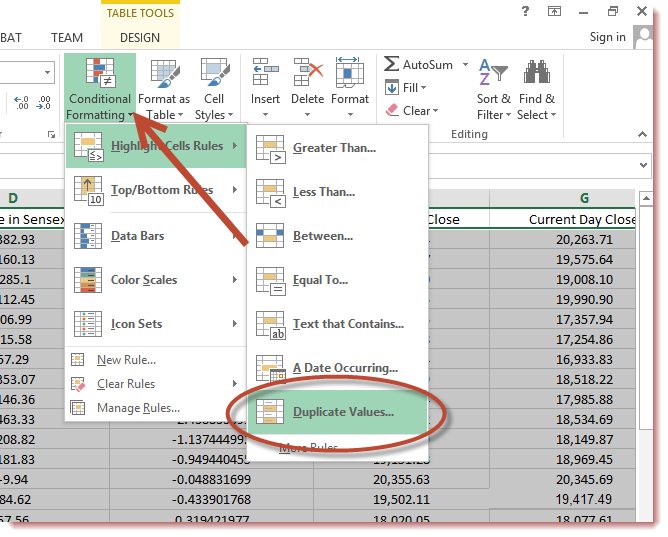
5. Click Conditional Formatting under Styles.
6. Select Highlight Cells Rules | Duplicate Values.
7. Duplicate Values dialog box will appear.
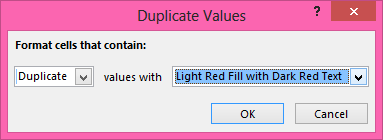
8. The first textbox denotes criteria. As a default, “Duplicate” option will be selected. If not, select that option.
9. The second textbox denotes formatting. Select any preferred formatting. The default formatting is Light red fill with dark red text. I recommend you to select Light red fill.
10. Click OK button.
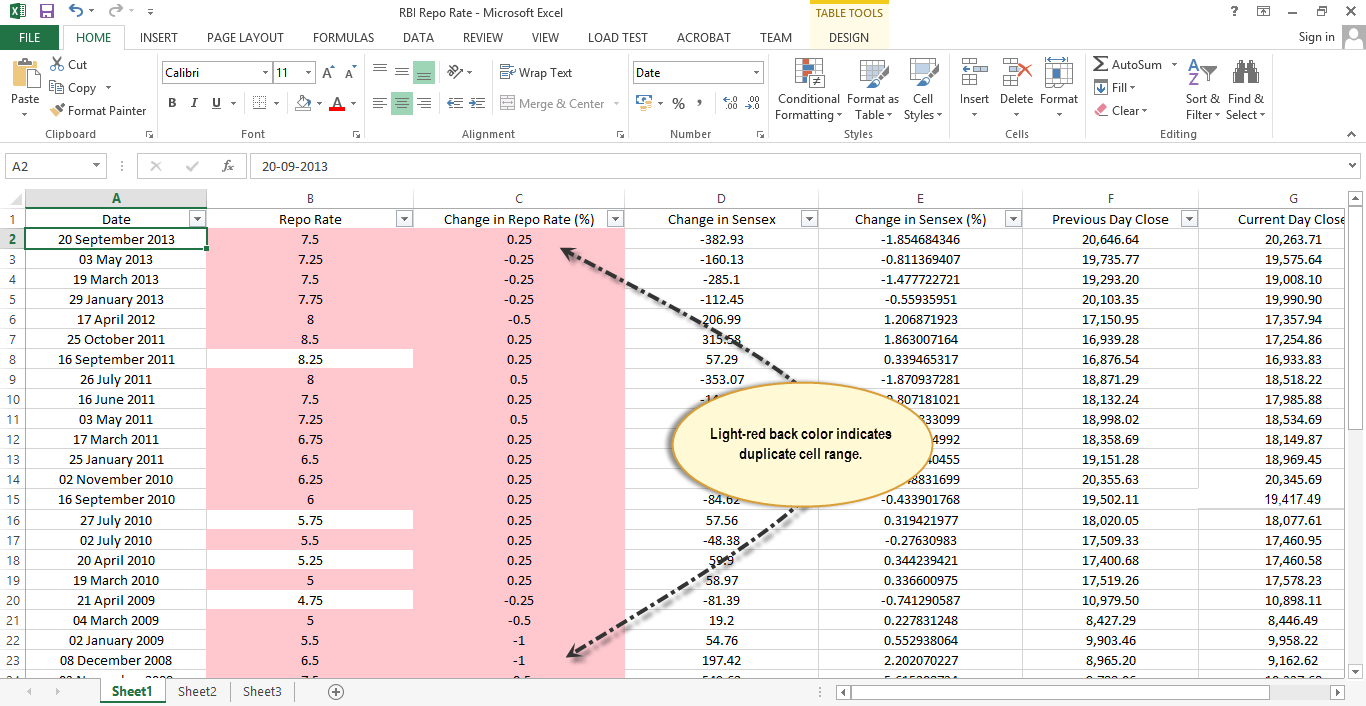
11. Depending on the formatting you selected, the font formatting of the duplicate cells will be changed. In case of Light red fill, duplicate cell background color will change to light red color.
12. Manually delete all cells that contain duplicate data.
Google Photos and OneDrive Business are prominent players in the realm of cloud migration. Both…
Are you running out of computer storage space because it is loaded with duplicate files?…
Hypervisor-protected code integrity, simply known as Memory Integrity in Windows 11, is used to shield…
The 1040-X is also known as the Amended U.S. Individual U.S. Income Tax Return form.…
Accountants manage tax return files as one of their services, and if they have many…
Whether music is your biggest passion or you only hear it from time to time,…