Listening to our favorite songs had never been this easy before. Most avid listeners listen to them non stop on various apps on their smartphones, while many people sue their laptops for this purpose. Listening on and on to songs makes up for a pleasing experience, relieving people of the fatigue caused by a long day at work.
However, the catch over here is that Windows Media Player pays the price for playing songs on and on for your good. Temporary files, duplicate songs and library items keep on piling up in it unless it chokes up. If you are facing such a situation, take quick action and organize all your songs using the Clone Files Checker – a duplicate finder that finds and removes duplicate songs in Windows Media Player library. Download it here:
Clone Files Checker Download (w/ Verisign Digital Certificate).
Compatible w/ Google Drive, Windows 10/8.1/8, Windows 7, Vista/XP.
By clicking to download, you agree to these Terms
See Features & Functions
This article will primarily focus on cleaning the following items:
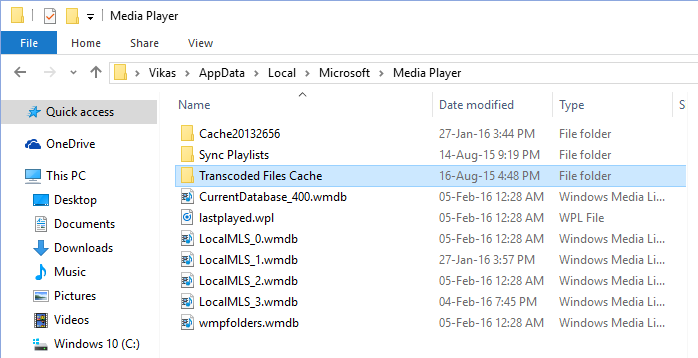
Windows Media Player automatically converts your media files to an appropriate size once you connect an external device such as a smartphone, tablet or an iPod. Such “converted” files are known as Transcoded Files. The Transcoded cache contains copies of previously transcoded files. Delete these files to regain storage space.
1. Press Windows Key + R simultaneously, type “AppData” and click OK
2. Open the following directory:
3. Press Ctrl + A simultaneously to select all files
4. Press Del to move all selected files to the Recycle Bin
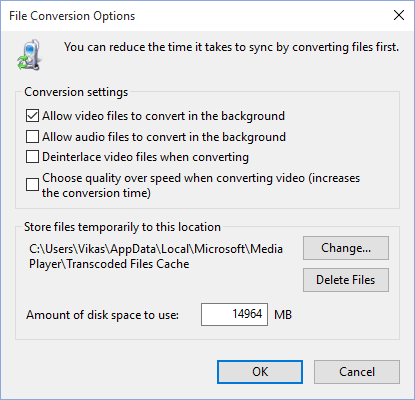
The default amount of disk space reserved for transcoding files is 14964 MB (14.61 GB) for a 1TB hard disk. The actual amount may vary depending on the HDD capacity as well as the number of partitions on it.
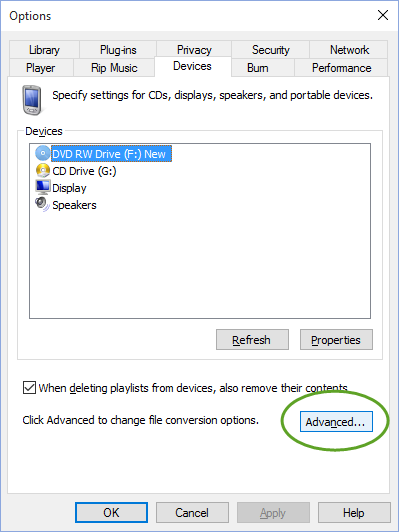
To reduce the amount of space reserved for files’ transcoding, use the File Conversion Options dialog:
1. Open Windows Media Player
2. Press Alt key to show the menu bar
3. Click Tools and select Options
4. On the Options dialog, click the Devices tab to configure settings related to portable devices, CDs and so on
5. Click the Advanced button
6. Now you will come across the File Conversion Options dialog. Specify a lesser amount in “Amount of disk space to use” textbox in terms of MB. Don’t make the folder size so small because this way the transcode feature won’t work and encounter an error. (Recommended: 7168 MB (7 GB), assuming the default size was 14 GB)
7. Click OK | OK. Exit and re-open Windows Media Player
Note: In Step # 6, do not use comma (,) and specify folder size in MB only considering that 1 GB = 1024 MB.
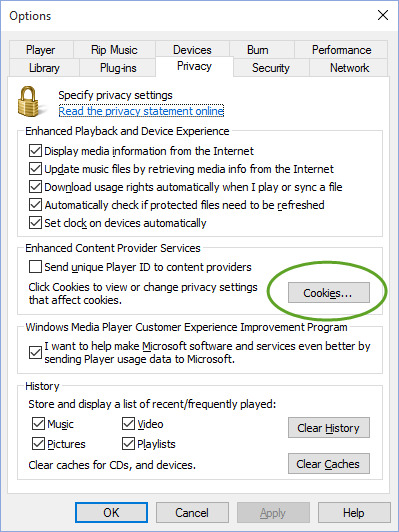
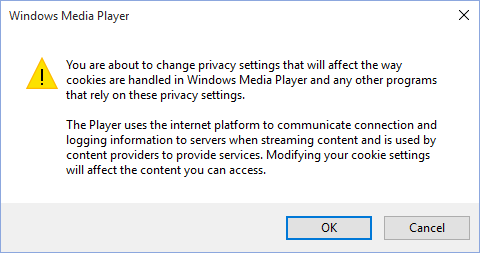
In computers, cookies are used for tracking purposes. They are small set of encrypted files that typically store non-personal information about the user which is retrieved every time you visit a particular website. And Windows Media Player is no exception. You can choose to delete cookies to free up some more disk space.
1. Open the Options dialog box
2. Click the Privacy tab
3. Click the Cookies button
4. A confirmation prompt shall appear. Click OK
Windows Media Player stores the list of recently / frequently played media files. This includes music, videos, playlists and pictures. It also stores caches of CDs, DVDs and other devices. You can delete such lists as well.
1. Open the Options dialog > Privacy tab
2. Click the following buttons in succession:
For Older Versions
This Registry tweak is useful only for older versions of Windows Media Player:
1. Make sure the player is closed before modifying its Registry entries
2. Click Start; type “RegEdit” and open “Registry Editor” from Search Results
3. Locate the following sub key:
4. In large right panel, you will see a string named either “RecentFileList” or “RecentURLList”
5. Delete that string. (Right click > Delete > Yes)
6. Close RegEdit
This trick works only for older versions of Windows Media Player. Content.IE5 folder includes both Windows Media Player and Internet Explorer temp files. Follow this step only if you’re using an extremely outdated Internet Explorer 5.
1. Exit Windows Media Player
2. Open Windows Explorer
3. Open the following directory:
4. Clear all contents of the folder named Content.IE5
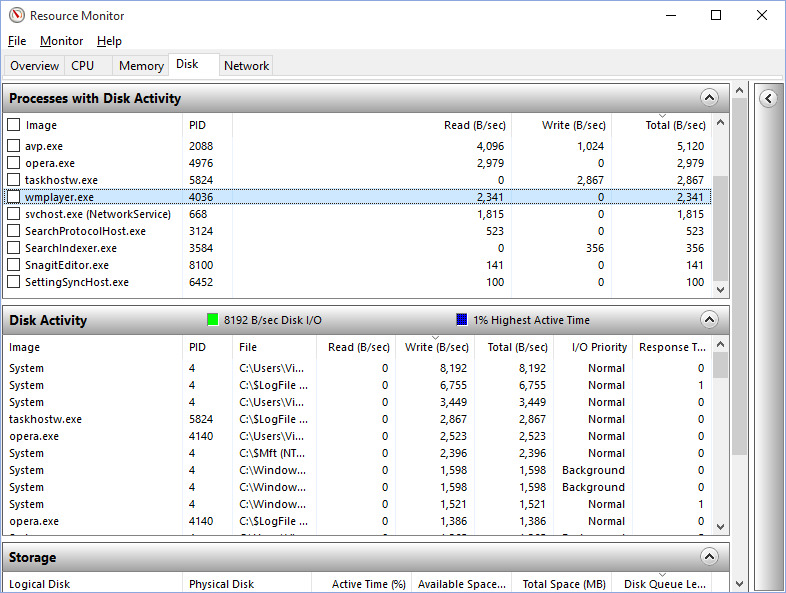
Windows Resource Monitor, a small tool comes to the rescue while determining dump files location.
1. Make sure Windows Media Player is running
2. Open Windows Resource Monitor by typing “resmon” in Search
3. You must now have five different tabs on your screen. Click the Disk tab to explore processes with their Disk Activity and other storage information
4. Expand the “Processes with Disk Activity” category, if it’s collapsed
5. Select “wmplayer.exe” process
6. Expand “Disk Activity” category
7. Click the column head named “Write (B/Sec)” to sort all items from the highest to the lowest
8. Now you can determine path to Windows Media Player’s dump data on the basis of files being written with the highest operational time
9. Clear corresponding folder contents using File Explorer
Note: Dump files written information will not be displayed if no content is being played at the moment or Windows Media Player is in idle mode.
Google Photos and OneDrive Business are prominent players in the realm of cloud migration. Both…
Are you running out of computer storage space because it is loaded with duplicate files?…
Hypervisor-protected code integrity, simply known as Memory Integrity in Windows 11, is used to shield…
The 1040-X is also known as the Amended U.S. Individual U.S. Income Tax Return form.…
Accountants manage tax return files as one of their services, and if they have many…
Whether music is your biggest passion or you only hear it from time to time,…