PhotoScape is an application developed to cater to the needs of amateur photo editors and casual users alike. It contains many useful functionalities such as photo viewer, photo editor, photo printer, photo combiner, frame creator, animated gif wizard.
The app itself doesn’t hold any photo; hence they can’t be removed from the application. However, the photos are consumed by the application; hence the duplicate photos can be removed before feeding to the application. It’s important to clean out duplicates before getting started as the application doesn’t have any internal mechanism to identify duplicates. Keeping the photo list clean from duplicates helps in many instances, such as when bulk printing, creating frames, combining multiple photos, otherwise the user has to manually remove them one by one wasting a tremendous amount of time.
Solution
This tutorial uses PictureEcho in order to clean up the duplicate photos from the PhotoScape photo list. PictureEcho is a duplicate remover which has the ability to identify visually similar photos with its advanced sophisticated algorithm, and remove them swiftly with its inbuilt functionalities. Go through the following steps to achieve the goal of this guide. This guide assumes that PhotoScape is already installed in the user’s computer system.
- Download and install PictureEcho.
- Launch PhotoScape from its desktop shortcut.
- Switch to the Viewer tab, and now browse your way to the folder in the left pane which contains duplicate photos.
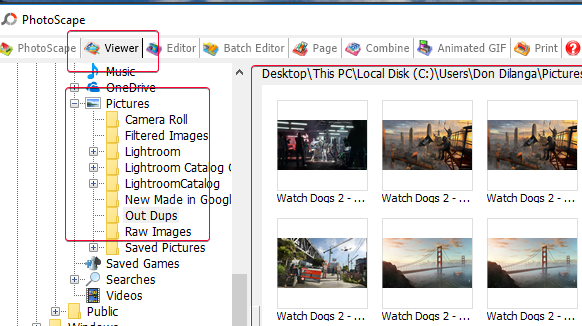
Browse to the folder in PhotoScape that contains duplicates - Now launch PictureEcho and add the same folder (that contains duplicates) which you selected in PhotoScape in the last step by clicking the Add Path button.
- Select the radio box for Exact Match and then select the Show preview checkbox. This helps to preview the duplicate photos within the user interface of the software. Finally, hit Start Search for initiating the scan.
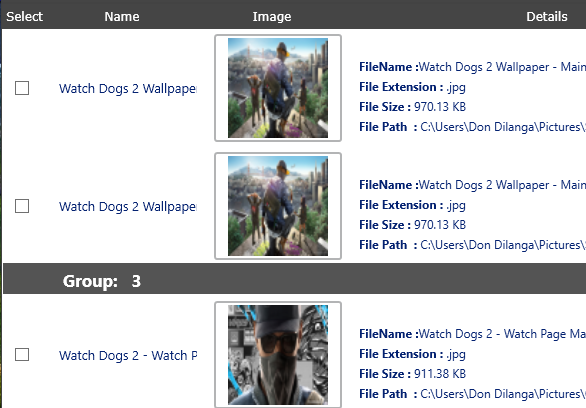
- Once the scan is over, you will notice all the detected duplicates populate the PictureEcho user interface.
- Now you have to first choose which kind of files you want to retain for each duplicate group, e.g. newest, biggest, high resolution etc. Simply click the Select Duplicates button and make your choice. You will also notice that, based on the option you selected, all the remaining images will be highlighted in green.
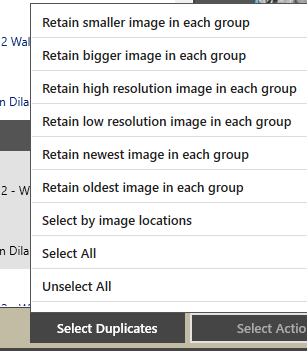
Choose which kind of duplicates will be retained 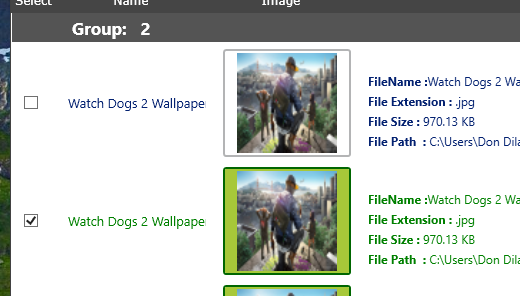
Duplicates selected!
- The final step entails clicking the Select Action button and choosing whether you want to permanently delete the duplicates or move them to a folder of your choice. The latter case is for a scenario in which you might have to fall back on these images if things somehow go bad.
- Now go back to the PhotoScape application, navigate to the Viewer tab once again and select the folder from the left pane (just like you selected in step # 3). Now you should be seeing the list of PhotoScape images and they would all be purged of the duplicates.

Warning: Undefined array key "author_box_bio_source" in /home1/clonefil/public_html/blog/wp-content/plugins/molongui-authorship/views/author-box/parts/html-bio.php on line 2
Raza Ali Kazmi works as an editor and technology content writer at Sorcim Technologies (Pvt) Ltd. He loves to pen down articles on a wide array of technology related topics and has also been diligently testing software solutions on Windows & Mac platforms. If you have any question about the content, you can message me or the company's support team.