According to Statcounter, 7 out of 10 desktop computers have the Windows operating system installed. The popularity of Windows is attributed to its user-friendliness. One of the essential features that often comes in handy for server administrators is managing a Remote File Server on their Windows PC without installing any third-party application.
Accessing a Remote File Server to manage it can be done via the WebDAV protocol, which Windows supports natively. This article demonstrates how to configure Windows to allow remote management over WebDAV protocol with ease. Since the WebDAV protocol has been around for a while, even Windows XP users can take advantage of this article without requiring the latest version of Windows. However, it’s advisable to use Windows 7 or above to have better security to prevent man-in-the-middle attacks.
Server-Side Configuration
Configuring a server for WebDAV protocol allows users to access its file system remotely. However, it largely depends on the service provider and the features available for the general public. It’s strongly recommended to subscribe to a provider that has inbuilt WebDAV support on their platform. It makes the whole configuration process convenient for the end-user as the service provider maintains the server free of charge. There are several WebDAV providers available online. Regardless of the provider, the general instructions to sign up on a WebDAV platform are as follows. In this guide, we will be using Qloud as a Remote File System provider.
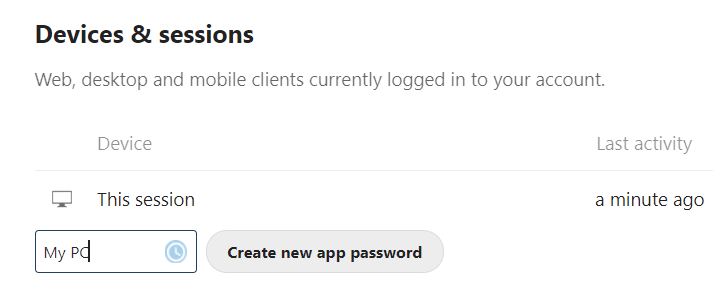
- Navigate to Security.

- Locate the Devices and sessions section. Type the app’s name, and click the Create new app password button to generate a password for this particular app. Rather than using the master password of the cloud account, it’s recommended to use an app password as it ensures the user assigned to the particular app gains no access to the settings. In addition, it allows sharing the same drive with multiple users without needing a single password. It will enable administrators to revoke the permission of any user without affecting the accessibility of other users.
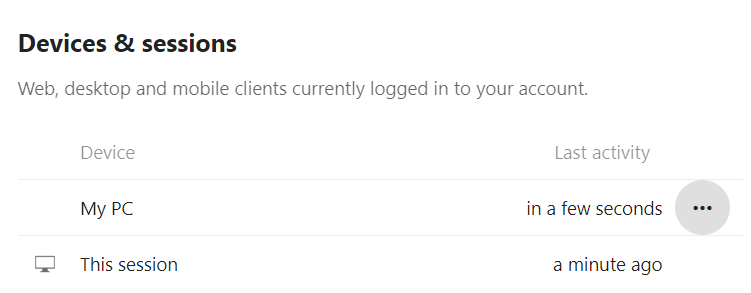
Adding up a new device - Once the password for the app is created, it will be listed in the Devices and sessions table. Each device represents an app that has a separate password. If the app is no longer needed, the permission can be revoked through the horizontal three-dotted button.
Client-Side Configuration
Client-side configuration allows the end-user to connect with the server over the WebDAV protocol. This phase requires the server URL, username and password of the WebDAV account. Additionally, either a third-party WebDAV client, Windows XP (or later) operating system with built-in WebDAV support. Several tools can be used to connect with the server. This guide uses the inbuilt Map network drive tool to connect with the server over the WebDAV protocol. It’s recommended to update Windows before proceeding as it ensures smooth operation.
- Click on the Start button, then start menu, then select File Explorer.
- Click on This PC in the navigation pane.
- Click on the arrow button at the upper-right corner to expand the ribbon.
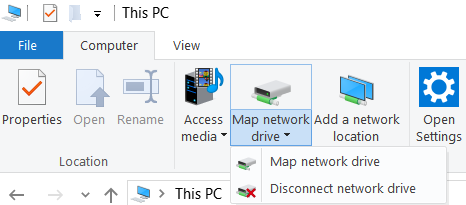
- Switch to the Computer tab, and then in the Network section locate the Map network drive option. Click the down arrow on this particular option and select Map network drive to start mapping a local drive with a Remote File Server.
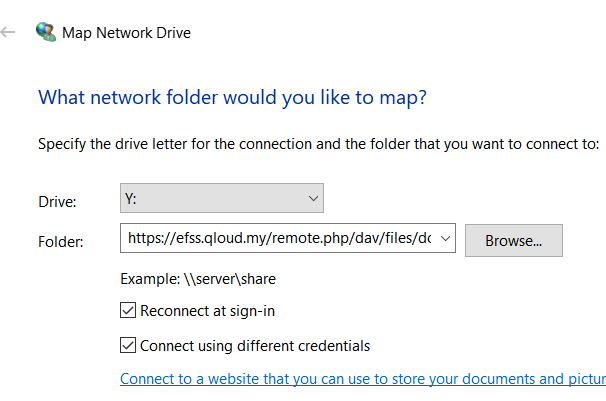
Start mapping a network drive - Clicking on the option above opens a Wizard where the drive to be mapped can be configured. In the drive option, select the alphabet you want to assign to the mapped local folder. In the folder option, type the full path of the WebDAV server. In this particular tutorial, the URL is supposed to be https://efss.qloud.my/remote.php/dav/files/<EMAIL>. Check both Reconnect at sign-in, and Connect using different credentials options that allow the user to use their username and password to connect to the server.
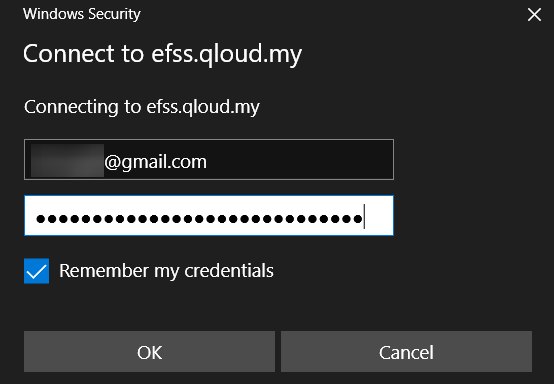
- When the above configuration was confirmed, Windows will prompt the user to enter the username and the password of the WebDAV server in a dialogue box. Type them both, check to remember the my credentials checkbox, and click OK to connect with the server.
- Once the mapping process is completed, a new drive will be created in the My PC section. It shows the username, the path of the WebDAV, and the available space of the Remote File Server. This drive can be used just as a regular partition on Windows.
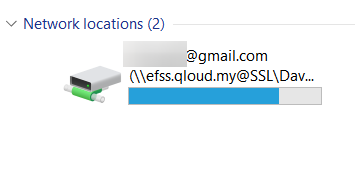
New drive visible in This PC
How to Find Available and Total Space of the Remote File Server?
Knowing the available and total space of the Remote File Server helps to manage the drive efficiently. This section demonstrates how to find these details with ease.
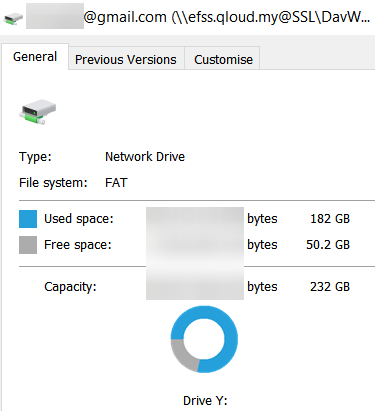
- Access the drive, right-click anywhere in the drive, and select Properties.
- Switch to the General tab. The Used space represents the utilized file server space, whereas free space represents the available space of the Remote File Server. Similarly, Capacity represents the total space of the Remote File Server.
Troubleshooting: If It’s unable to connect to the WebDev server
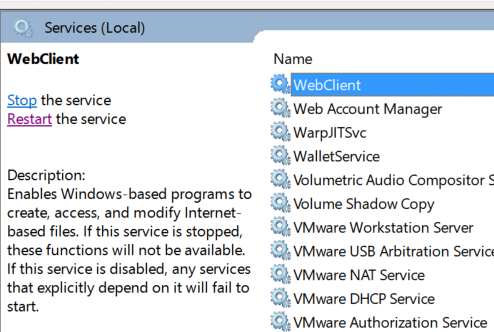
Even if the instructions above were followed precisely, the end-user might not be able to connect with the WebDAV server if Windows isn’t configured correctly. WebClient service is a prerequisite for WebDAV mapping to work. If it’s not running in the background, mapping might not work as expected. Use this section to find out how to turn it on.
- Click on the Start button to open the start menu, then search for Services.
- Click on Services to open the Windows Services window.
- Locate WebClient service, and click to select it.
- If it’s not running in the background, click the Start button on the left-hand pane.
- Right-click on the service, select Properties.
- In the Properties Window, switch to General. Select the Automatic option in the start-up type option, which automatically starts the service when Windows boots up. If this option isn’t selected, the WebClient service will have to be manually started whenever Windows boots up.
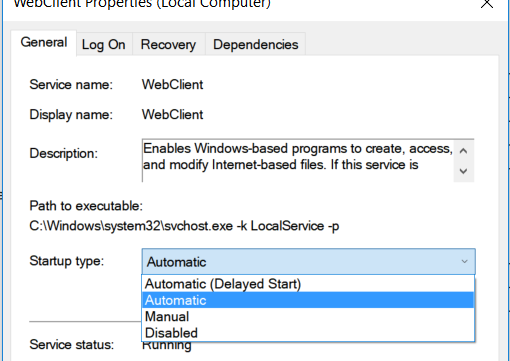
Selecting the startup type of your choice

Warning: Undefined array key "author_box_bio_source" in /home1/clonefil/public_html/blog/wp-content/plugins/molongui-authorship/views/author-box/parts/html-bio.php on line 2
Raza Ali Kazmi works as an editor and technology content writer at Sorcim Technologies (Pvt) Ltd. He loves to pen down articles on a wide array of technology related topics and has also been diligently testing software solutions on Windows & Mac platforms. If you have any question about the content, you can message me or the company's support team.