Burning photos to a DVD is a method of copying photos from a PC or a laptop to another, besides backing them up just for the sake of creating a safety buffer. Often times, some pictures are saved several times by mistake. This means they are occupying storage space that is several times of what they actually should.
In this case, the user must find a solution that works fast and delivers perfect results. Doing so is a good idea, only if the total number of duplicate photos is a small number. In a scenario where the duplicates run into hundreds (or beyond), it will become a nightmare by all means. This gives rise to the need of looking for an automated method. Let’s go in more details.
Part 1: How to Remove Duplicate Photos?
Duplicate photos occupy valuable storage space and slow down computer searches (if their numbers run into big quantities). This is a topic that can’t be emphasized enough. There are various software solutions that are designed to take care of this issue with an extreme level of sophistication while leaving very little to the user. One such software program is described in detail below.
Clone Files Checker
It is a duplicate clean application, which cleans up all kinds of duplicate files (including photos). It is extremely light in utilizing system resources and performs its job with extreme accuracy.
- Download, install and launch Clone Files Checker on your PC/ laptop. It can be downloaded from https://www.clonefileschecker.com/
- Add all folder(s) where you suspect any duplicate photos are located.
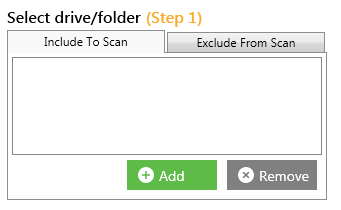
Adding up the folder/ drive which will be scanned - Click Start Search to launch the scan and wait for it to finish.
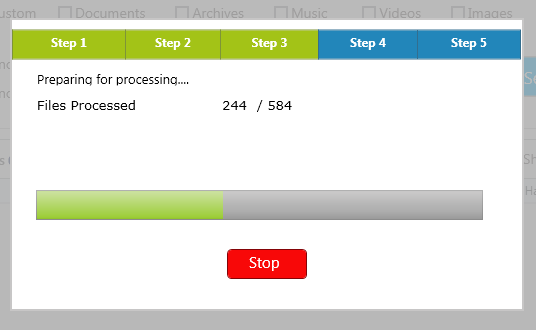
- The scan result will be out in a while.
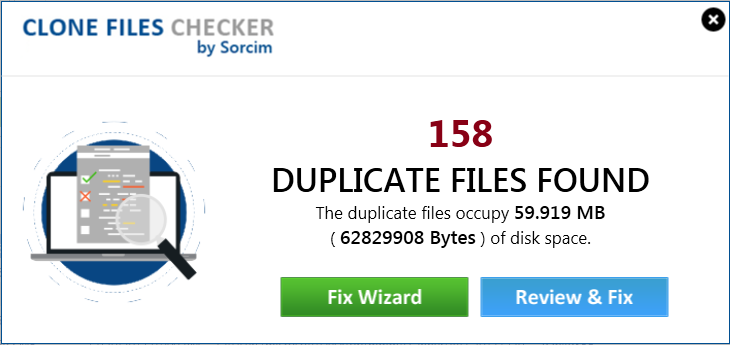
Scan results - Delete duplicate photos by selecting the given actions in the software, which are all very straightforward and self-explanatory.
Part 2: How to Burn Photos to A DVD?
As already mentioned, burning photos to a DVD means copying photos from the computer to the DVD. Various software solutions are also available to burn photos to a DVD, but this task can easily be performed via File Explorer.
Method 1: Indigenous Solution
To burn photos to the DVD, the system must have an optical disc drive with writing capability. If the DVD drive has writing capability, it will contain DVD-R written on it. The following few steps are given below for the user’s ease.
- Insert an empty DVD in the DVD drive, and wait until you can spot the icon for a blank DVD in This PC.
- Prepare the DVD for the burning process
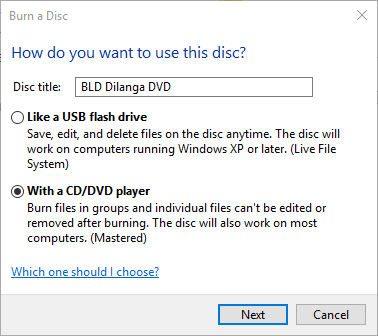
If those photos are located in various folders, then don’t select the photos just begin the burning process by double-clicking on the above icon which results in showing the following window. - Select how to use the DVD
Two options will then be displayed on the screen; the first option is Like a USB flash drive. This option allows the user to use the disc on other systems to burn more photos, and the second option is With a CD/DVD player, which allows users to use the DVD on TV, but users can burn photos only once to that DVD.
Choose wisely - After the process has initiated, the drag and drop option will be available on the screen through which users can add all the photos they want to burn.
- Click Burn to start copying the photos to the disc.
Method 2: Use a third-party software
- Nero Burning ROM is a software that burns photos to a DVD just as the inbuilt burning feature in File Explorer, however, it is equipped with more advanced functionalities. It is compatible with Windows 7, 8, 8.1 and 10. Users can use the trial version for 15 days before buying the software.Some simple steps to use this software are given below
- Insert a blank disc and open the software.
- Select CD or DVD burner option according to your need.
- Drag the photos that have to be burned.
- Click the Burn now option to start burning the photos.
- Ashampoo Burning Studio FREE, its name suggests, is a free software that burns photo to a DVD. This software also comes with advanced functionality to burn photos than File Explorer and has a user-friendly interface that makes it very easy to use. The paid version of this software is available with advanced functionalities as Nero Burning ROM.
Some simple steps to use this software are given below- Download and install the software.
- Open the software and insert an empty disc in the drive.
- Add a new folder and move the photos to it.
- Edit the title of the disc.
- Click the next button to start the process.

Warning: Undefined array key "author_box_bio_source" in /home1/clonefil/public_html/blog/wp-content/plugins/molongui-authorship/views/author-box/parts/html-bio.php on line 2
Raza Ali Kazmi works as an editor and technology content writer at Sorcim Technologies (Pvt) Ltd. He loves to pen down articles on a wide array of technology related topics and has also been diligently testing software solutions on Windows & Mac platforms. If you have any question about the content, you can message me or the company's support team.