Managing the resources is an important task since every resource in this world is limited. This is relevant for computer industry too as many hardware components are manufactured with the help of earthly materials. This article focuses on cleaning the system partition of the hard drive in Windows 10 to free up more space for the user.
Usually, it’s not recommended to manually dig into the system partition for cleaning its contents as even a single mistake might prove to be catastrophic for the whole system, but this article guides the user in such a way that there are no chances for any fallout, if these instructions are followed religiously.
Solutions
Solution 1: Use ST-Cleaner by Sorcim Technologies
There are many ways to clean the system partition to regain space out of the system partition, but ST Cleaner is the most efficient way to do so. The entire process is automated and error-free. There is virtually no risk of anything going wrong as ST takes extra care while scanning in sensitive areas.
- Download it from the following website. https://www.stcleaner.com
- Install it. It’s strongly recommended to install it in the system partition (example c :\) since installing in the system partition enables it to get more privileges. Therefore, it can remove maximum unnecessary files from the system partition.
- Switch to the System Cleaner tab.
Solution 2: Use the Disk Cleanup Option in Windows
Disk Cleanup tool is a fantastic aid to remove a lot of unnecessary files which aren’t usually deleted by third party software. This tool is an inbuilt one as it comes integrated into the Windows installation. However, it removes certain valuable contents such as memory dump files which are required for analyzing System Errors, Windows Update copies which aren’t really necessary but may prove useful if the user has to move back to the previous version in the future. Disk cleanup does allow the user to decide which content to remove.
- Locate the system partition. In most of the cases, it is the C drive.
- Right-click on it and click on Properties to access the system partition’s properties.
- Find Disk Cleanup and click on it.
- Click on Clean up system files. You will be prompted for Administrative permissions.
- In the Second tab, click on Clean up in the System Restore and Shadow Copies section. This removes any restore points and shadow copies of Windows. It’s important to remember that when the system restore points are removed, it effectively puts the computer at risk as it the system gets corrupted in the future, system restore won’t be able to bail you out as it normally does by restoring your computer to an earlier point in time when it was working perfectly.
- Switch to the first tab again. Select the contents to remove and click OK to initiate the cleaning process.
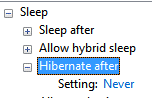
Solution 3: Turn Off the Hibernation in Windows
Hibernation is a unique feature which allows the user to turn off the computer without actually shutting down the computer. So the computer can get back to the previous state within seconds when the user desires so. The advantage of this feature is it doesn’t close any programs that are opened as it stores the entire contents of the system memory in the hard drive and restores them when the user turns the system “on”. The disadvantage of this mode is that it consumes a significant amount of the hard drive which is roughly equal to the system memory. Let’s say if the system memory has 4GB space, then windows reserves 4GB in the hard drive for the hibernation mode.
- Click on the start button.
- Type Command Prompt.
- Right-click it and select Run as administrator.
- Type the following command and press Enter to execute it Powercfg –h off (use on instead of off to turn on the hibernation)
- Open the start menu once again.
- Type Edit power plan.
- Click on Change advanced power settings.
- Disable hibernation from every option.
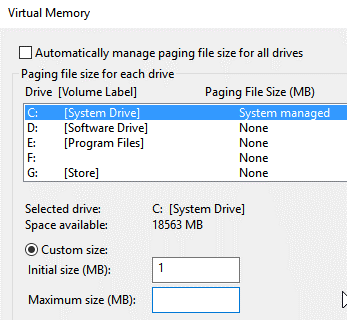
Solution 4: Reduce the Virtual Memory
Virtually memory helps the OS to use the space in the hard drive when the system memory runs out of space. This is extremely useful particularly for stuff like Games, 3D Software, Graphics Designing programs which are highly memory intensive. It’s a better idea to leave this option in its default state, but if space is an important factor and if the system memory is quite large then it’s fine to turn off the virtual memory. However, if the system memory runs out of space, Windows may crash or lead to the blue screen of death. Therefore, make sure Windows has enough system memory before turning this option off.
- Open the start menu.
- Type sysdm.cpl and open it from the search result.
- This will open the System Properties window. Switch to the Advanced tab.
- Click on Settings to open the Performance Options. Now switch to the Advanced tab.
- Locate the Virtual Memory group.
- Click on Change.
- Enter the desired values in the following text boxes. Make sure they are large enough to prevent Windows from crashing.
Solution 5: Uninstall Unnecessary Software Programs
As the name implies, getting rid of unnecessary software from the system saves up a lot of space on the C Drive. This is particularly handy as every program is designed to install in the Windows drive by default unless the user chooses otherwise.
- Click on the start button.
- Type Add or remove programs and open it from the search result.
- The APPS & FEATURES Window will open up where all software can be uninstalled permanently.

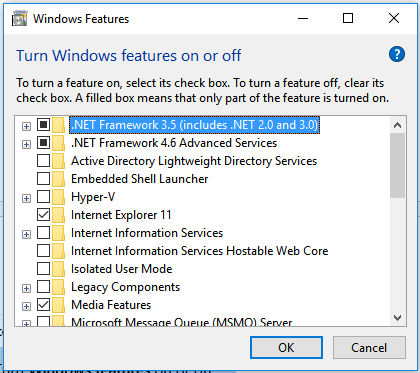
Solution 6: Turn Off Windows Features
Windows features is a hidden section which expands the capability of the Windows operating system. Windows do have a lot of unnecessary features as far as the average user is concerned and they can be easily disabled through this section. And it will surely help regain a lot of disk space too.
- Click on the start button to open the start menu.
- Search for “Turn Windows features on or off”. And then click on it from the search result.
- Search every single feature from Microsoft’s Official Website and disable them if you don’t deem them to be of any help to you. This process might be a bit time consuming but the end results will surely justify the time and effort you put in.

Warning: Undefined array key "author_box_bio_source" in /home1/clonefil/public_html/blog/wp-content/plugins/molongui-authorship/views/author-box/parts/html-bio.php on line 2
Raza Ali Kazmi works as an editor and technology content writer at Sorcim Technologies (Pvt) Ltd. He loves to pen down articles on a wide array of technology related topics and has also been diligently testing software solutions on Windows & Mac platforms. If you have any question about the content, you can message me or the company's support team.