Files management is integral to productive computing. We’ve to deal with tons of files which need to be transferred and stored in a well-organized form. Here are given a few important tips that would help you compress data in your Windows, Mac and delete the duplicate files from Windows PC.
Compressing data helps us create more disk space and send files easily while removing duplicate files help us create more hard drive space as well as organize data perfectly.
How data compression software works?
A data compression software encodes and compresses information into as few bits as possible with the help of different algorithms.
What are the various levels of compression? Which one should I use?
When you make a new compressed file, you’re prompted to select a Compression Level. Based on the compression level, we can classify the programmers into two types:
Strict
Some programmers attempt to make new algorithms that tightly compress as much information as possible in order to save the bits while still being able to recover the original information. We can call this technique as Higher Compression Level.
Lenient
The lenient programmers prefer sacrificing a few bits than building a tightly compressed file. This improves the latency, i.e. the time it takes for a specific block of data on a data track to rotate around to the read/write head. Such data takes lesser time to decode.
The highest level of compression takes longer time to decode the information and vice versa.
If you’re going through extreme disk space issue, select the higher compression level. If you’re more concerned about the operational time, select the lower compression level.
What is Decompression?
Decompression is the process of restoring the compressed/ encoded information to its normal form in order to use, read and modify. It is a process of reversing data compression. In many file compression software, “Extract” icon is displayed to decompress the information.
How is data compression useful?
- It’s called as “zipping the files”. Imagine you’ve to go to a picnic, so you stuff all your clothes into a lightweight suitcase. That’s pretty similar to compressing files.
- No need to attach dozens of files one after another as email attachments.
- File compression saves the disk space.
- Compress, auto-email and auto-shutdown facility available. That is, many file compression program have a option to automatically email the compressed file and shutdown your PC automatically. No need to wait long.
- Portable file compression programs are available. Meaning, store the portable programs on a USB Flash Drive, no need to install on user’s PC.
- Enables storing same amount of data in fewer bits without compromising the content quality.
- Variety of data compression levels available
- Economic option. You save large amount of disk space; no need to purchase external hard disk or subscribe costly cloud computing services.
Compressing Files in Microsoft Windows
To compress files in Microsoft Windows, you need to use a third party program such as WinRAR, WinZip or 7 Zip File Manager. There are many other programs available as well.
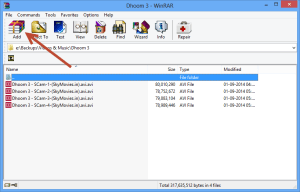
1. Open your File Compression software, say WinRAR.
2. In the Address Bar open the parent folder and select the files you would like to compress.
3. Click the “Add” icon.
4. Archive Name and Parameters dialog will open. Specify the Archive Name.
5. Set different options such as Archive Format, Compression Level, Volumes, auto-shutdown PC, automatically updating the archive file after original files are modified, etc.
6. You can also specify a strong password.
7. Click the OK button to start the process.
To decompress the file at any time, simply double click it and then click the “Extract to” icon and specify a path to extract the file contents.
Compressing Files in Mac OSX
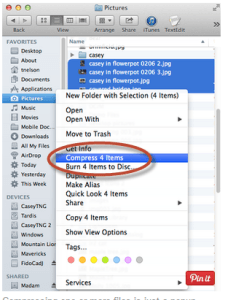
1. Locate the parent directories and select the multiple files you would like to compress. Use the Shift key to select multiple files.
2. Now right click your selection area, and select “Compress” option from the right-
click options menu bar.
3. The file compression process will start.
What are Duplicate Files?
Duplicate files are identical copies of one another. To put it in other words, these files are located in different folders of your hard disk and they’ve the same content.
How software and user activities are responsible for creation of duplicate files?
Duplicate files are dropped into various directories or drives by different software applications installed on your PC. Software applications make temporary copies of different files which are left unchanged after the application closes. Dynamic Link Library (DLL) files are common in this respect as many software applications leave them unchanged after invoking temporarily during runtime.
It is wrong to say only software applications are responsible for creation of duplicate files. It is very common to find duplicate copies of other files such as documents, music, images, videos, archives and so on. Not only software applications but also user activities are responsible for creation of redundant files. Who knows if many GBs of your hard disk are wasted by duplicate files?
How duplicate files affect my PC?
The computer performance depends on the amount of free space available. The process of creation of duplicate files occupies larger disk space and it leads to fragmentation of the partitions. Fragmentation is the process of disintegrating contents of a file into multiple parts that are stored in multiple sectors of the hard disk. It thus apparently takes longer time to retrieve the file contents which in turn affects your PC performance and stability. That is the main reason why your computer gradually turns slower and starts freezing.
Deleting Duplicate Files in Microsoft Windows
1. Download and install the Clone Files Checker.
2. In the main user interface, add the directories to scan. If you want to exclude certain sub folders, exclude them from the scan.
3. Set the appropriate search options. Choose whether you want to scan all files or certain file types such as documents, images, music, videos or archives.
4. You can further customize the scan. You can set the program to ignore files smaller or higher than specified file size.
5. Now start the actual scan process. It may take some time depending on the size of selected directories.
6. If you want to automatically clean-up the duplicate files, use the “Quick Fix” option. To manually select and clean-up the files, use the “Review & Fix” option.
" data-author-type="
Warning: Undefined array key "type" in /home1/clonefil/public_html/blog/wp-content/plugins/molongui-authorship/views/author-box/html-layout.php on line 18
" data-author-archived="
Warning: Undefined array key "archived" in /home1/clonefil/public_html/blog/wp-content/plugins/molongui-authorship/views/author-box/html-layout.php on line 19
">
Warning: Undefined array key "id" in /home1/clonefil/public_html/blog/wp-content/plugins/molongui-authorship/views/author-box/html-layout.php on line 39
-"
Warning: Undefined array key "archive" in /home1/clonefil/public_html/blog/wp-content/plugins/molongui-authorship/views/author-box/html-layout.php on line 40
itemscope itemid="" itemtype="https://schema.org/Person" >
Warning: Undefined array key "img" in /home1/clonefil/public_html/blog/wp-content/plugins/molongui-authorship/views/author-box/parts/html-avatar.php on line 4
Warning: Undefined array key "show_social_web" in /home1/clonefil/public_html/blog/wp-content/plugins/molongui-authorship/views/author-box/parts/html-socialmedia.php on line 6
Warning: Undefined array key "show_social_mail" in /home1/clonefil/public_html/blog/wp-content/plugins/molongui-authorship/views/author-box/parts/html-socialmedia.php on line 7
Warning: Undefined array key "show_social_phone" in /home1/clonefil/public_html/blog/wp-content/plugins/molongui-authorship/views/author-box/parts/html-socialmedia.php on line 8
Warning: Undefined array key "type" in /home1/clonefil/public_html/blog/wp-content/plugins/molongui-authorship/views/author-box/parts/html-name.php on line 17
Warning: Undefined array key "type" in /home1/clonefil/public_html/blog/wp-content/plugins/molongui-authorship/views/author-box/parts/html-name.php on line 19
Warning: Undefined array key "type" in /home1/clonefil/public_html/blog/wp-content/plugins/molongui-authorship/views/author-box/parts/html-name.php on line 21
Warning: Undefined array key "archive" in /home1/clonefil/public_html/blog/wp-content/plugins/molongui-authorship/views/author-box/parts/html-name.php on line 37
Warning: Undefined array key "name" in /home1/clonefil/public_html/blog/wp-content/plugins/molongui-authorship/views/author-box/parts/html-name.php on line 41
Warning: Undefined array key "author_box_bio_source" in /home1/clonefil/public_html/blog/wp-content/plugins/molongui-authorship/views/author-box/parts/html-bio.php on line 2
Warning: Undefined array key "bio" in /home1/clonefil/public_html/blog/wp-content/plugins/molongui-authorship/views/author-box/parts/html-bio.php on line 8


