PhotoStick is a pen drive used to back up photos with a single click. It comes in various sizes including 32 GB, 64 GB, 128 GB and a whopping 1TB! PhotoStick can be connected to any computer with the help of the standard USB port. Even though PhotoStick’s promos claim it can be used for backing up photos, it is equally handy in backing up documents, videos, music files.
The advantage of this small hardware device is it being optimized for media content, and thus it is ideal for backing up personal multimedia in order to guard against any accidental loss. This guide demonstrates how to weed out duplicate photos from PhotoStick with ease by providing 3 solutions for our readers’ benefit.
Solutions
Solution 1: The Native Method
The native method is the default way that can be used to eliminate duplicate photos while they are being copied to the drive. This method is reliable to a greater extent. In this solution, we will make use of the PhotoStick app that comes with the device itself. The software by default scans the entire computer and copies the photos to the drive. All the photos are copied to the same folder in the drive regardless of the location on the computer they are being fetched from, and thus the duplicate content is renamed to comply with rules imposed by Windows itself. Since only the earliest version of all images saved to PhotoStick, any duplicates aren’t accepted into the drive at all.
- Plug in the PhotoStick drive to the USB port.
- Now launch the installation file from the PhotoStick drive and install it.
- Once the PhotoStick software has been successfully installed, launch it.
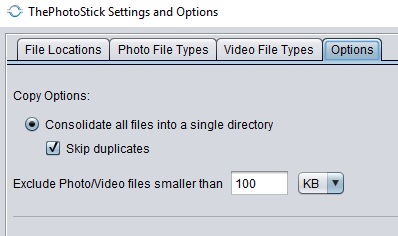
- Navigate to the ThePhotoStick Settings and Options section and click the Options tab.
- Select both Consolidate all files into a single directory and Skip duplicates options.
Selecting the right options
From now onwards, no duplicate content will be copied into the drive from the computer. However, this method is affected by limitations of its own. The PhotoStick app is designed to back up the earliest version of a particular photo and treat all other versions as duplicates. So even if the user wants to back up a different version of the photo, the app doesn’t do it on its own. This is one factor which might definitely not go down too well with professional photographers as well as graphics designers, people who have to deal with multiple versions of a single image and often have to retain several versions of an image.
Solution 2: Use Clone Files Checker
Clone Files Checker is a duplicate file remover equipped with a lot of advanced features. It comes with an easy-to-use interface, which makes it an ideal solution convenient for removing duplicate content of any file format with ease. Clone Files Checker is available for both Windows as well as MacOS. It is extremely light on system resources and performs the job with utmost accuracy.
- Download and install Clones Files Checker from its website:
https://www.clonefileschecker.com/ - Launch the application and add the folder which has to be scanned for duplicate photos.
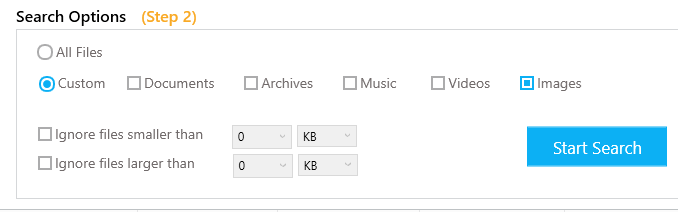
- In the next step, click Custom | Images to direct the application to scan for images/ photos only and ignore all other file types. Doing so will significantly reduce the scan time, and thus it’s highly recommended.
- Now hit the Start Search button to initiate the scan. The time it takes for the scan to conclude depends on the number of images that reside in the selected folder.
- Once the scan is over, you will see a summary pop-up on the screen, showing the number of duplicates detected as well as the storage space lost to them. Click Review & Fix in this pop-up.
- Now you will be seeing the list of all the duplicates that have been detected in the scan. Click Select Duplicates, and now select one of the available options from the list. This option makes Clone Files Checker standout from the default app of PhotoStick as the former allows the user choose which files are to be backed up while PhotoStick backs up the first version of the file.
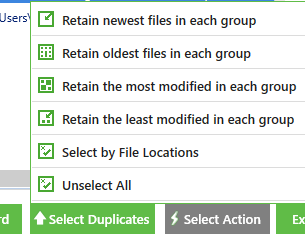
Options in the Select Duplicates menu - Click Select Action and choose between Permanent Delete and Move to Folder. Both the options are self-explanatory, with the Move to Folder one allowing the user to back up the photos to a directory of their choice.
Solution 3: Java Based Solution
Using Java to do the trick is a sophisticated method in removing duplicate photos. This method is recommended for advanced users as it removes all the duplicate content regardless of its file format. Also, it supports many other platforms such as Linux, FreeBSD, Raspberry Pi and many others, besides the most common Windows and MacOS. This allows people to take full advantage of PhotoStick device on virtually every platform where Java runs. However, only those users who are equipped with all the necessary know-how of Java can take advantage of this method.
This Solution requires Java Runtime Environment Software Development Kit (SDK), hence make sure they are installed in the system prior to following this.
- Navigate to the following website from where the Java source code file can be downloaded.
https://github.com/stormyqq/Duplicate-File-Remover/blob/master/DuplicateFileRemoverTwo - Click the Raw button to bring up the text mode of the file.
- Now save the file as a text file via your Internet Browser.
- Java Runtime Environment Software Development Kit can be downloaded from https://www.java.com/en/download/. Install it, and configure the environment path to C:\Program Files\Java\jdk1.8.0_191\bin
- Launch Command Prompt and change the current directory to the folder where the Java source code is saved.
cd C:\Users\%username%\Documents\JavaDupTest - Compile the java source code file to bytecodes which run on top of the Java virtual machine.
cd C:\Users\%username%\Documents\JavaDupTest - Execute the bytecode file
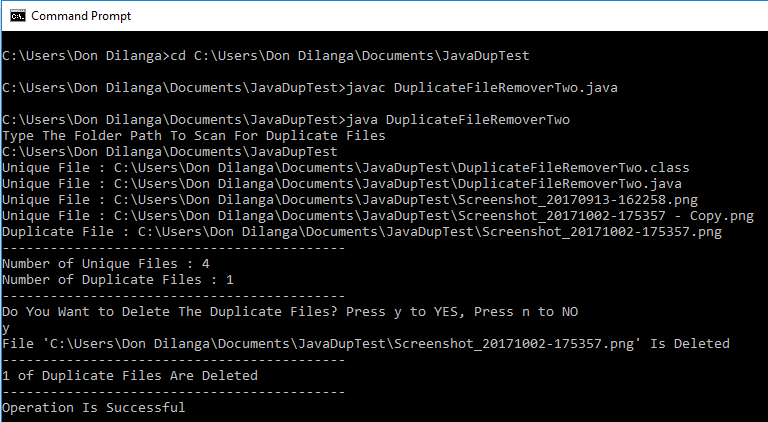
java DuplicateFileRemoverTwo - When the code is executed, it asks at the outset for the folder to be scanned for duplicate files. Type the full path in Command Prompt as seen in the following screenshot and hit Enter to proceed. In the following screenshot, the following path was used for duplicate files scan.
C:\Users\Don Dilanga\Documents\JavaDupTest

Warning: Undefined array key "author_box_bio_source" in /home1/clonefil/public_html/blog/wp-content/plugins/molongui-authorship/views/author-box/parts/html-bio.php on line 2
Raza Ali Kazmi works as an editor and technology content writer at Sorcim Technologies (Pvt) Ltd. He loves to pen down articles on a wide array of technology related topics and has also been diligently testing software solutions on Windows & Mac platforms. If you have any question about the content, you can message me or the company's support team.