At some point of time in your life, you may want to change your cloud account and migrate from one account to another. Manually transferring files from Dropbox to Microsoft OneDrive has never been so easier. Even though there are a few bottlenecks that might affect you during the process, ranging from low upload speed to file sync errors and beyond, we have penned down this comprehensive guide that contains the best and most efficient techniques that help to transfer your cloud content at lightning speed.
Method # 1: Auto Migrate Files Over-the-Cloud
The easiest and surely recommended method is to transfer files over-the-cloud. A web app will facilitate you and make the entire process as simple as cut & paste! This also means you won’t be needing to download and install any special software before migrating your data.
Features
- End-to-end encryption protects user’s privacy
- Secludes sensitive data from others
- Get things done within your browser without installing any tools
- Lightning speed performance
- Promised uptime servers
- Supports major cloud storages including Microsoft OneDrive, DropBox, Box, Google Drive, Amazon Drive, Amazon S3, Copy and many others
- Supports bulk migration (data & user)
- Single-prompt account authentication
- Scheduled backups
- Takes care of sharing permissions during data transfer
- No session logout hassle
- Maintains detailed log of each file
Step # 1: Get a File Transfer Web App
- Visit the MultCloud Web App.
- Create a new account. It’s totally free of cost. You’ll be prompted to activate it via the email account you provided during the registration process.
Step # 2: Obtain Permissions to Access Cloud Accounts
- Visit the File Manager page of MultCloud Web App.
- Click the File Manager tab.
- Now click Add Cloud Drives.
- This will bring up the cloud service selections page. Click the Dropbox icon.
- Click Next.
- Specify a Display Name.
- Click Add Dropbox Account. Accept the credentials when you’re prompted to allow access permissions for Dropbox.
- Now add your OneDrive account by clicking on Add Cloud Drives and selecting the relevant icon.
- Click Next button, specify a Display Name.
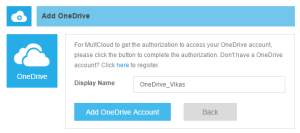
Add Your OneDrive Account - Click Add OneDrive Account.
- Click Yes to confirm the access permissions for your Microsoft OneDrive cloud storage account.

Now you will be seeing both the Dropbox and OneDrive tabs on the left panel of the window.
Step # 3: Transfer Files Over-the-Cloud
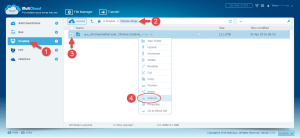
- Click the Dropbox icon, navigate through your files, use checkboxes to select folders and files you desire to transfer.
- Right-click your selection and choose the Copy to option.
- In the new dialog, click OneDrive icon.
- As a default, it will only copy your files. Original files will not be altered. However, if you wish, you can move the content by using the Move checkbox. In case of multi-selection, select the concerning checkbox.
- Click the Transfer button.
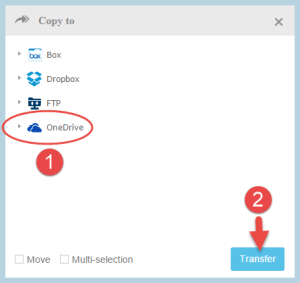
Launch the file transfer by clicking Transfer


That’s it folks; you’ve initiated the file transfer. Please wait for it to complete on its own.
Bonus Tip: Expand your Traffic to 10 TB
Obtain an additional 10 TB of traffic for your MultCloud web app. Here’s how:
- Click the To get 10 TB traffic for Free link on the upper-right corner of your screen.
- Publish the message MultCloud-Free App for Transferring Files across Cloud Drives on a social media website, set the post visibility to public and then copy and paste the post’s link in the URL Address box.

- Click Submit.
Method # 2: Manual Transfer
Dropbox comes with a downloadable app that synchronizes your data and facilitates you to transfer files from/ to the cloud storage. It gives you direct access to your cloud account straightforward from your local HDD. However, this is a very time-consuming process as the upload and download will take several hours to complete. This process is recommended only when your cloud data size is low.
Step # 1: Get DropBox Client
- Visit the DropBox software download page.
- Download Dropbox to your local hard drive, double-click it and then follow the installation procedure.
- Enter the log-in credentials to sign-in.
Step # 2: Download Files to Local HDD
- After successful log-in, click the Files tab and then you’ll get the list of all files.
- Select all the folders and files you wish to download.
- Click More actions | Download items.
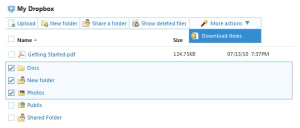
Click Download items - The download will start. Be patient and let it complete on its own.

Step # 3: Delete Duplicate Content
Duplicate files are inevitable. At times, we upload the same files over and again. This results in a steady decline in the storage space available to us. This also increases download/ upload time, costing us our internet bandwidth as well as wasting our time.
Thanks to the technology; there are tools by which you can automatically get rid of duplicate documents, spreadsheets, presentations, music, images, wallpapers, videos, movies, archives etc. Sorcim’s Clone Files Checker will shorten your data transfer process, reduce bandwidth usage, save Internet data and time required to perform the operation. The process is simple:
- Download and install Clone Files Checker.
- Click the Add button on left side of the screen.
- Select folders containing your downloaded files.
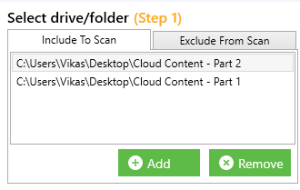
- Select All files or Custom option to specify the file types.
- Customize the scan filters, click Start Search.
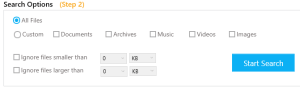
Specify scan filters and then click Start Search - After the scan is over, you’ll have two options namely Quick-Fix and Review & Fix. The former automatically applies a uniform action on all files while the latter shows detailed results in a list box so that you can take a different action for different sets of files.


Step # 4: Upload your Files on OneDrive
- Visit the Microsoft OneDrive website.
- Click the Upload icon, and then choose the Folder option.
- Locate desired folder(s) containing all of your downloaded files. They will be uploaded onto Microsoft servers.

Raza Ali Kazmi works as an editor and technology content writer at Sorcim Technologies (Pvt) Ltd. He loves to pen down articles on a wide array of technology related topics and has also been diligently testing software solutions on Windows & Mac platforms. If you have any question about the content, you can message me or the company's support team.